Are you looking to free up some storage space on your Samsung device? If so, this blog post is for you! In this guide, we’ll provide a step-by-step overview of how to change your storage from internal storage to an SD card. We’ll walk you through the process, explain the advantages of using an SD card and answer any questions you might have. By the end of this post, you’ll be able to easily move your data and media to your external SD card and free up valuable space. So let’s get started!
Supported Samsung Galaxy Device
Samsung Galaxy F34, Samsung F32, Samsung F31, Samsung F30, Samsung Galaxy Z Fold 5, Z Fold 4, Z Fold 3, Z Fold 2, Z Fold, Samsung Galaxy Z Flip 5, Z Flip 4, Z Flip 3, Z Flip 2, Z Flip, Samsung Galaxy M34, Samsung M33, Samsung M32, Samsung M31, Samsung M30, Samsung Galaxy F54, Samsung F53, Samsung F52, Samsung F51, Samsuing F50, Samsung Galaxy A24, Samsung A23, Samsung A22, Samsung A22, Samsung A21, Samsung A20, Samsung Galaxy F14, Samsung F13, Samsung F12, Samsung F11, Samsung F10, Samsung Galaxy M54, Samsung M53, Samsung M52, Samsung M51, Samsung M50, Samsung Galaxy A54, Samsung A53, Samsung A52, Samsung A51, Samsung A50, Samsung Galaxy A34, Samsung A33, Samsung A32, Samsung A31, Samsung A30, Samsung Galaxy M14, Samsung M13, Samsung M12, Samsung M11, Samsung M10, Samsung Galaxy S23 Ultra, Samsung S23 Plus, Samsung S23, Samsung S22, Samsung S22 Ultra, Samsung S21, Samsung S21 Ultra, Samsung S20, Samsung S20 Plus, Samsung Galaxy A14, Samsung A13, Samsung A12, Samsung A11, Samsung A10, Samsung Galaxy F04, Samsung F03, Samsung F02, Samsung F01, Samsung Galaxy A04e, Samsung A03e, Samsung A02, Samsung A04s, Samsung A03s, Samsung Galaxy Xcover 6, Samsung Xcover 5, Samsung Xcover 4, Samsung Xcover 3, Samsung Xcover 2.
Insert the SD Card
To get started, you’ll need to insert an SD card into your Samsung device. Locate the SD card slot, which is typically found on the side or back of your device. Take your SD card, and carefully insert it into the slot until it clicks into place.
Be sure to insert the card in the correct orientation to avoid any damage. Once inserted, your device will recognize the SD card and you’ll be ready to proceed with changing your storage. It’s a simple step, but an important one in order to expand your storage capacity and free up space on your device.
Access Device Settings
Now that you have your SD card inserted, it’s time to access the device settings on your Samsung device. This is where you’ll find all the necessary options to change your storage. To access the settings, simply swipe down from the top of your screen to open the notification panel. Look for the gear icon, which represents the settings app, and tap on it.
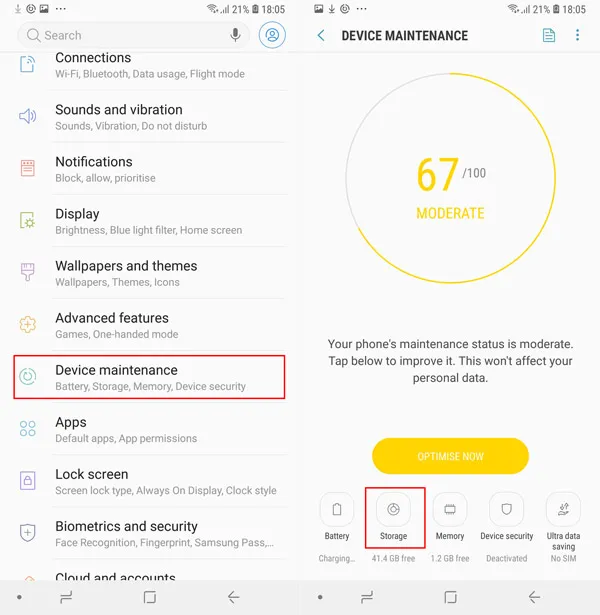
This will take you to the main settings menu. From here, you’ll need to scroll through the options until you find the one that says “Device Care” or “Device Maintenance.” Once you’ve located it, tap on it to continue with the process of changing your storage.
Scroll to Device Care or Device Maintenance
Once you have your SD card inserted, it’s time to navigate to the settings on your Samsung device. To do this, swipe down from the top of your screen to open the notification panel. Look for the gear icon, which represents the settings app, and give it a tap. This will bring you to the main settings menu.
From here, you’ll want to scroll through the options until you come across “Device Care” or “Device Maintenance”. These options may vary slightly depending on your Samsung model. Once you find it, go ahead and tap on it. This is where you’ll find all the tools and settings you need to change your storage. So let’s move on to the next step!
Read Also: How to Easily Cancel Sirius XM Subscriptions And Plans
Storage Management
Now that you’ve accessed the device settings on your Samsung device, it’s time to dive into storage management. This is where you’ll find all the tools and options to change your storage from internal to SD card. In the storage management section, you’ll have the ability to view and manage the storage on your device, including how much space is being used and what types of files are taking up the most room.
You’ll also have the option to format your SD card if needed, which can help optimize its performance. This is an essential step in the process of changing your storage, as it allows you to have a clear understanding of your current storage situation. So let’s explore the storage management section and take control of your device’s storage space!
Transfer Files to SD Card
Now comes the exciting part – transferring your files to the SD card! This step is crucial for freeing up storage space on your Samsung device. Once you’re in the storage management section of your device settings, you’ll see an option to transfer files to your SD card. Simply select the files or folders you want to move and tap on the “Move to SD Card” button.
Your device will start the transfer process, and depending on the size of the files, it may take some time. Be patient and let your device do its magic! Once the transfer is complete, you can verify that the files have been successfully moved by checking the SD card’s storage. Congratulations, you’ve successfully freed up space on your Samsung device!
Select Items to Move And Move Files
Now that you’re in the storage management section, it’s time to select the items you want to move to your SD card and start the file transfer process. Take a look at the files and folders listed and choose the ones that are taking up the most space on your device.
This could include large media files, such as photos and videos, or documents that you don’t need immediate access to. Once you’ve made your selections, simply tap on the “Move to SD Card” button. Your device will begin the transfer process, and you’ll be able to monitor its progress. Sit back and let your Samsung device work its magic. Soon enough, you’ll have successfully moved your files to the SD card and freed up valuable storage space on your device. Keep in mind that some files may not be able to be moved to the SD card, so double-check before making any final selections.
Conclusion
In conclusion, changing your storage from internal to an SD card on your Samsung device is a simple yet effective way to free up valuable space. By following the step-by-step guide provided in this blog post, you can easily transfer your data and media to the external SD card.
This not only allows you to keep your important files safe but also optimizes your device’s performance. The storage management tools and options available on your Samsung device make the process seamless and hassle-free. So don’t let storage limitations hold you back. Take control of your device’s storage space today and enjoy the benefits of having more room for the things that matter most to you. Happy storage management!