Deleting text messages on your iPhone involves just some simple steps. In this post, I will show you how you can get this done if you do not know how to do it already.
Supported iPhone Devices
- iPhone 15
- iPhone 15 Plus
- iPhone 15 Pro
- iPhone 15 Pro Max
- iPhone 14
- iPhone 14 Pro
- iPhone 14 Pro Max
- iPhone 13
- iPhone 13 Mini
- iPhone 13 Pro
- iPhone 13 Pro Max
- iPhone 12 Mini
- iPhone 12
- iPhone 12 Pro
- iPhone 12 Pro Max
- iPhone 11
- iPhone 11 Pro
- iPhone 11 Pro Max
- iPhone XR
- iPhone XS Max
- iPhone XS
- iPhone X
- iPhone 8 Plus
- iPhone 8
- iPhone SE (1st + 2nd Gen)
- iPhone 7 Plus
- iPhone 7
- iPhone 6s Plus
- iPhone 6s
- iPhone 6
iPhone Messaging App
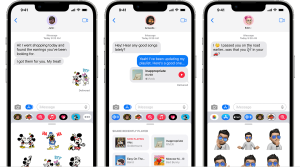
Within the Messages app, you have the power to manage your conversations, eliminating messages, attachments, and entire chat threads at your discretion. The beauty of these actions is that they don’t impact what your recipients observe on their end. Additionally, you can utilize the “Undo Send” feature to promptly retract a message sent in error, erasing it from both your device and your recipient’s device, but you must act within a two-minute window. Here’s how:
Deleting Messages, Attachments, and Conversations:
- In the Messages app, navigate to the conversation or message containing content you wish to remove.
- To delete a specific message or attachment, tap and hold on it until a menu appears. Select “More” from the options, then choose the messages or attachments you want to delete by tapping the circle icons next to them.
- After selecting, tap the trash can icon to remove the chosen items.
- To delete an entire conversation, go back to your list of conversations, swipe left on the chat you wish to remove and tap “Delete.”
Utilizing “Undo Send” for Message Retraction:
- If you’ve unintentionally sent a message you wish to retract, act swiftly. After sending, you’ll see an option at the bottom of the screen that says “Undo.” Tap it immediately.
- This action will recall the message within a two-minute timeframe, effectively erasing it from both your device and your recipient’s device. Keep in mind that it only works within this limited window.
By mastering these features, you can efficiently manage your Messages app content, ensuring your communications are precisely as you intend them to be while safeguarding against inadvertent message mishaps.
How to Delete Messages and Attachments on iPhone
The Messages app on your iPhone can quickly become a repository of countless text messages, images, and attachments. To keep your device organized and free up storage space, it’s essential to know how to efficiently delete messages and attachments. Follow these steps to declutter your Messages app and regain control over your digital conversations:
- 1. Launch the Messages App: Begin by opening the Messages app on your iPhone. You’ll typically find this app on your home screen, represented by a green speech bubble icon.
- 2. Access a Conversation: Within the Messages app, select the conversation containing the messages or attachments you wish to remove. Tap on the conversation to enter it.
- 3. Select Messages or Attachments: Once inside the conversation, locate the message bubble or attachment that you want to delete. To initiate the deletion process, touch and hold the specific message bubble or attachment you wish to remove. This action will prompt a menu to appear.
- 4. Tap “More”: From the menu that appears after holding the message or attachment, tap on “More.” This option enables you to select multiple messages or attachments for deletion.
- 5. Choose Messages and Attachments: With the “More” menu open, you can now select the individual messages or attachments you want to delete. Simply tap the circle icons next to each message or attachment to mark them for removal. You can select as many as you like.
- 6. Tap “Delete”: After marking the messages or attachments you wish to remove, look for the “Delete” button located at the bottom of the screen. Tap this button to confirm the deletion. The selected messages or attachments will be permanently removed from the conversation.
You can efficiently manage your Messages app content, eliminating unnecessary clutter and preserving your device’s storage space. Keep in mind that deleted messages and attachments cannot be recovered, so exercise caution when selecting items for deletion. Maintaining a clean and organized Messages app not only streamlines your digital communication but also helps keep your iPhone running smoothly.
How to Delete Multiple Attachments
Deleting Multiple Attachments in Messages:
- Open the Messages app on your iPhone.
- Tap the conversation with the person or group you’re messaging.
- Scroll down to the category (e.g., Photos) containing the attachments you want to remove.
- Tap “See All.”
- Select the items you wish to delete by tapping each one.
- Finally, tap “Delete” to remove the selected attachments.
How to Delete a Message
If your Messages app is cluttered with old conversations or messages you no longer need, it’s essential to know how to tidy things up. Follow these simple steps to delete individual messages and multiple conversations effortlessly:
Deleting Individual Messages:
- Access the Messages App: Open the Messages app on your iPhone, typically represented by a green speech bubble icon on your home screen.
- Navigate to the Conversation: In the Messages conversation list, find the conversation containing the message you want to delete.
- Swipe Left and Tap “Delete”: Swipe left on the conversation in question. After swiping, you’ll notice a “Delete” button appear. Tap it, and the selected conversation will be permanently removed.
Deleting Multiple Conversations:
- Open the Messages App: Start by launching the Messages app on your iPhone.
- Enter Edit Mode: In the Messages conversation list, tap “Edit” located in the top-left corner of the screen. This action will allow you to select multiple conversations for deletion.
- Select Conversations: Once in Edit mode, tap “Select Messages” to choose the conversations you wish to delete. You can tap on multiple conversations to select them.
- Confirm Deletion: After selecting the desired conversations, tap “Delete” to erase them from your Messages app. This action will remove all selected conversations simultaneously.
How to Permanently Remove Recently Deleted Messages
Messages and attachments that you’ve deleted might linger in the Recently Deleted folder for up to 30 days, potentially cluttering your iPhone. To regain storage space and ensure these items are gone for good, follow these steps to permanently remove them:
Step 1: Open the Messages App
- Begin by launching the Messages app on your iPhone. You’ll find this app icon, usually a green speech bubble, on your home screen.
Step 2: Access Recently Deleted Messages:
- In the Messages conversation list, you have two options to access your Recently Deleted messages:
- a. Option 1 – Using “Edit”: – Tap “Edit” located in the top-left corner of the screen. – After tapping “Edit,” select “Show Recently Deleted” to reveal your deleted messages.
- b. Option 2 – Using “Filters”: – Tap “Filters” in the top-left corner of the screen. – Then, choose “Recently Deleted” from the available options.
- If you’re currently in a conversation, simply tap the “Back” button to return to the conversation list.
Step 3: Permanently Delete Messages:
- In the Recently Deleted folder, select the conversations containing messages you want to remove permanently. Tap to choose them.
- Next, tap the “Delete” button, usually represented by a trash can icon, and follow the on-screen instructions to confirm the permanent deletion.
How to Automatically delete old messages on iPhones
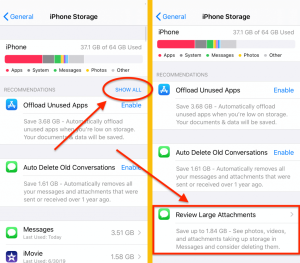
Is your Messages app cluttered with old conversations and attachments, making it difficult to find what’s relevant? Fortunately, you can set your iPhone to automatically delete messages and attachments that are older than a specified time frame, helping you maintain a tidy and organized digital communication space. Here’s a step-by-step guide on how to achieve this:
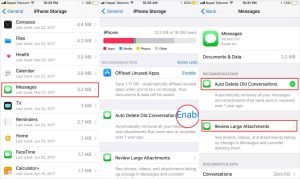
Step 1: Access Message Settings:
- Open the “Settings” app on your iPhone. You can find this app on your home screen.
- Scroll down and locate “Messages” within the list of settings options. Tap on it to enter the Messages settings.
Step 2: Configure Message Deletion Settings:
- Within the Messages settings, scroll down until you find the section labeled “Message History.” Here, you’ll see an option called “Keep Messages.” Tap on it to proceed.
Step 3: Choose an Automatic Deletion Option:
After tapping “Keep Messages,” you’ll be presented with several options for automatically deleting older messages:
- 30 Days: Selecting this option will ensure that messages and attachments older than 30 days are automatically removed from your device.
- 1 Year: Opting for this setting will delete messages and attachments that are older than one year, helping you maintain a more extended message history.
Step 4: Confirm Your Choice:
- After selecting your preferred automatic deletion option, your iPhone will prompt you to confirm your choice. Tap “Delete” or “Keep” based on your selection.
You can streamline your iPhone’s message storage and prevent it from becoming cluttered with old conversations and attachments. This feature is especially useful for those who wish to maintain a manageable and organized Messages app without manual intervention. Keep in mind that messages and attachments meeting the specified age criteria will be permanently deleted, so ensure you’ve backed up any crucial information before implementing these settings.