Cookies, those tiny but mighty data packets, play a pivotal role in enhancing your online experience. To harness their benefits on your iPhone, a few settings adjustments are all it takes. I will guide you on how you can enable cookies on your iPhone and even do more in this blog post. It’s time to delve into the world of improved browsing and personalized experiences—let’s get started!
Supported iPhone Devices
- iPhone 15
- iPhone 15 Plus
- iPhone 15 Pro
- iPhone 15 Pro Max
- iPhone 14
- iPhone 14 Pro
- iPhone 14 Pro Max
- iPhone 13
- iPhone 13 Mini
- iPhone 13 Pro
- iPhone 13 Pro Max
- iPhone 12 Mini
- iPhone 12
- iPhone 12 Pro
- iPhone 12 Pro Max
- iPhone 11
- iPhone 11 Pro
- iPhone 11 Pro Max
- iPhone XR
- iPhone XS Max
- iPhone XS
- iPhone X
- iPhone 8 Plus
- iPhone 8
- iPhone SE (1st + 2nd Gen)
- iPhone 7 Plus
- iPhone 7
- iPhone 6s Plus
- iPhone 6s
- iPhone 6
Why You Should Enable Cookies on iPhone
Enabling cookies on your iPhone is important for these five simple reasons:
- Improved Website Functionality: Cookies help websites remember your preferences and settings, making your online experience smoother and more tailored to your needs.
- Effortless Logins: With cookies enabled, you won’t need to repeatedly log in to websites, saving you time and frustration.
- Personalized Content: Cookies enable websites to deliver content and recommendations that match your interests and browsing history.
- Shopping Convenience: Online shopping is easier with cookies as they remember items in your cart and your shopping preferences.
- Saved Progress: Cookies can remember where you left off in online forms and applications, preventing data loss and simplifying tasks.
How to Enable Cookies on iPhone
If you’re encountering issues while browsing on your iPhone and suspect that cookies might be the culprit, fear not—here’s a step-by-step guide to help you enable cookies and get your online experience back on track.
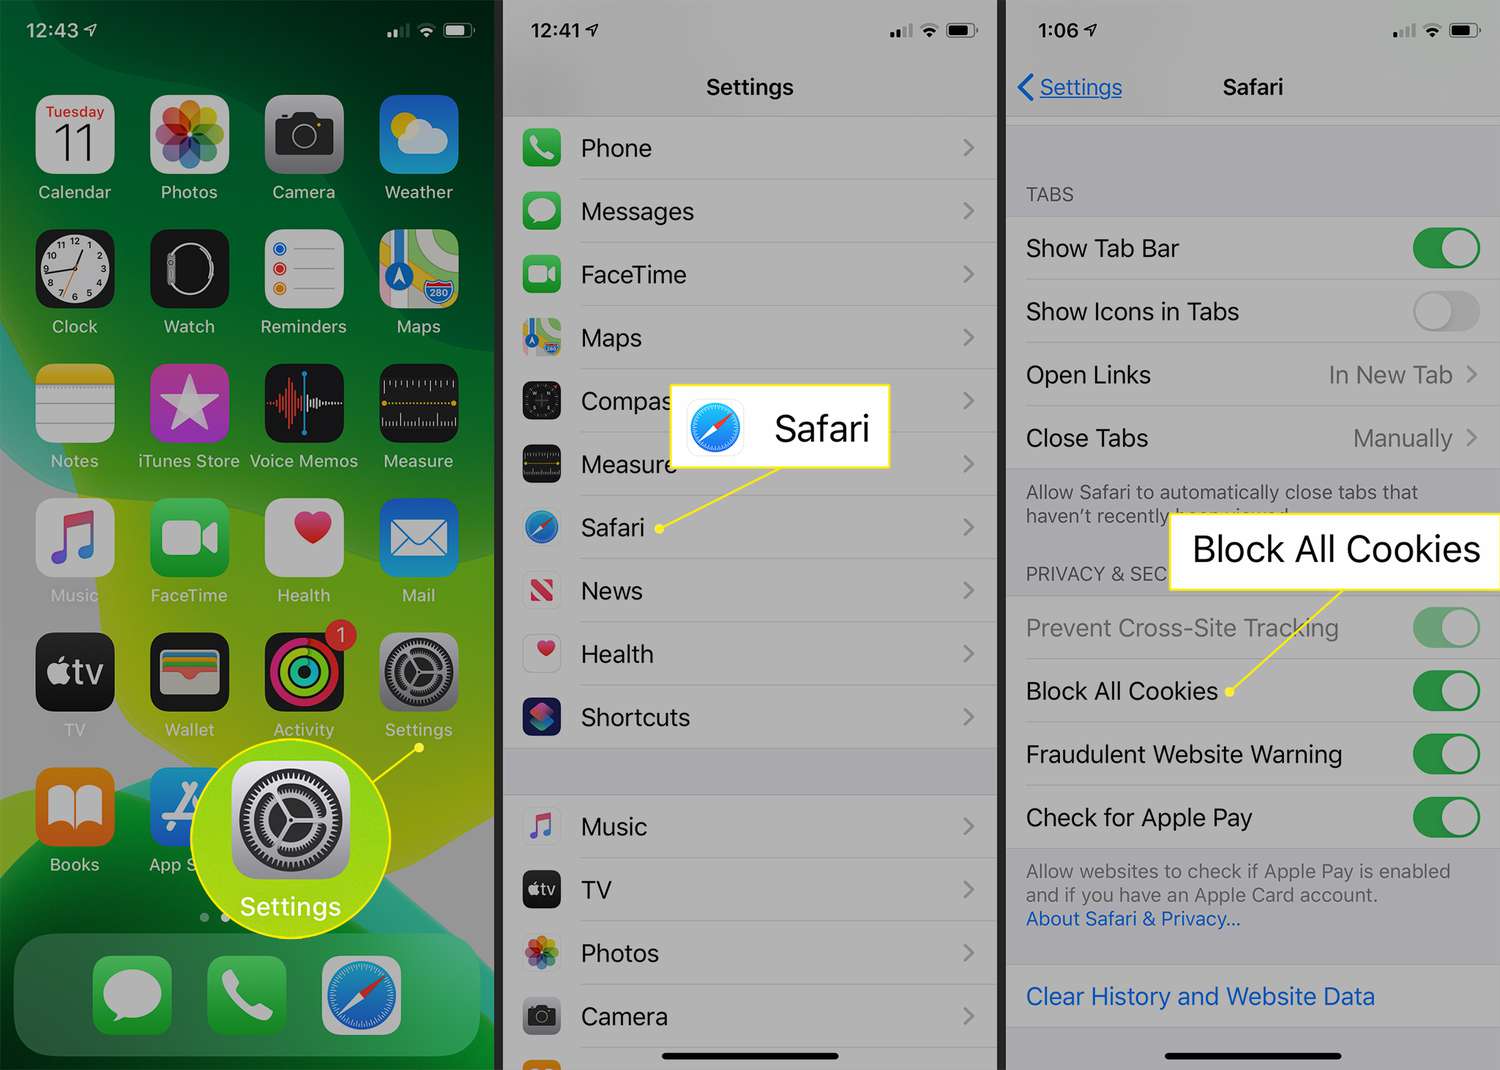
Step 1: Access Settings Begin by unlocking your iPhone and locating the “Settings” app, which typically sports a gear-wheel icon. Tap to open it.
Step 2: Navigate to Safari Scroll down the Settings menu until you find the “Safari” option. Safari is Apple’s default web browser, and this is where you’ll manage your cookie settings. Give it a tap to proceed.
Step 3: Adjust Cookie Settings Inside the Safari settings, look for the “Block All Cookies” option. Tap on “Block All Cookies” to access the toggle switch and make sure it’s in the “Off” position.
Step 4: Confirm and Conclude With “Block All Cookies” successfully turned off, your iPhone is now set up to accept cookies from websites. This adjustment should help resolve any browsing issues you’ve been experiencing.
Enabling Cookies in the Chrome App on Your iPhone
Cookies are essential for a smoother browsing experience, and by default, the Chrome app on your iPhone typically has them enabled. However, if you ever need to ensure cookies are turned on or make adjustments, here’s how you can do it:
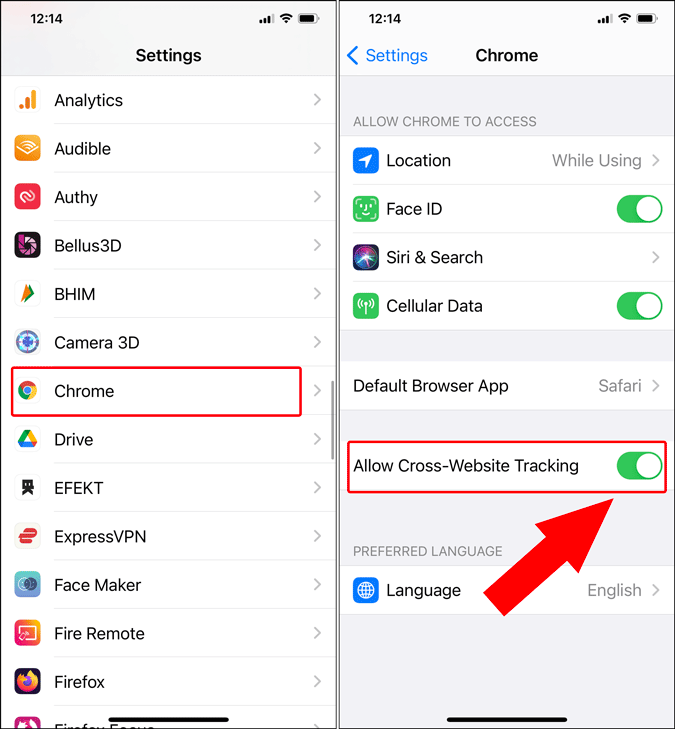
Step 1: Open the Chrome App Unlock your iPhone and locate the Chrome app icon. Tap it to open the app.
Step 2: Access Chrome Settings In the Chrome app, navigate to the lower-right corner, where you’ll spot three dots, representing the menu. Tap on these dots to access the Chrome settings.
Step 3: Configure Cookie Settings Within the Chrome settings menu, scroll down until you find the “Cookies” option, often listed alongside “Site Data.” Tap on it to access your cookie settings.
Step 4: Allow Cookies You’ll now see the option to allow cookies. Ensure that the toggle switch is in the “On” position. This setting allows websites to store cookies on your device.
Step 5: Confirm the Changes After turning on cookies, tap “Done” at the top-right corner to confirm your changes.
Congratulations! You’ve successfully enabled cookies on your iPhone within the Chrome app. This ensures a seamless browsing experience, allowing websites to remember your preferences and provide you with personalized content. Enjoy your enhanced online adventures!