In this post, I will help you to locate the microphone on all iPhones. If you are having trouble locating where the microphone is on your device, this post will guide you to see that in no time.
Supported iPhone Devices
- iPhone 15
- iPhone 15 Plus
- iPhone 15 Pro
- iPhone 15 Pro Max
- iPhone 14
- iPhone 14 Pro
- iPhone 14 Pro Max
- iPhone 13
- iPhone 13 Mini
- iPhone 13 Pro
- iPhone 13 Pro Max
- iPhone 12 Mini
- iPhone 12
- iPhone 12 Pro
- iPhone 12 Pro Max
- iPhone 11
- iPhone 11 Pro
- iPhone 11 Pro Max
- iPhone XR
- iPhone XS Max
- iPhone XS
- iPhone X
- iPhone 8 Plus
- iPhone 8
- iPhone SE (1st + 2nd Gen)
- iPhone 7 Plus
- iPhone 7
- iPhone 6s Plus
- iPhone 6s
- iPhone 6
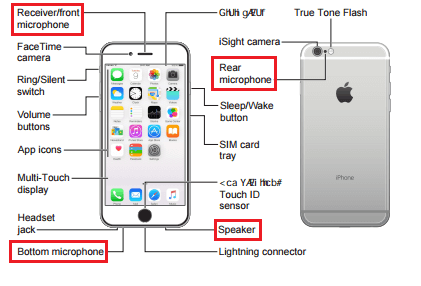
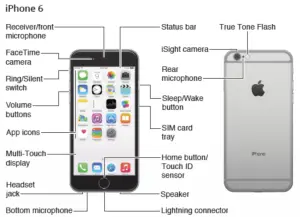
How to locate the Microphone on Newer Models of iPhone
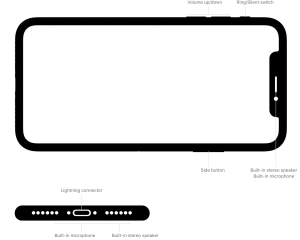
Newer iPhone models, ranging from the iPhone 6s to the iPhone 14, are equipped with an impressive array of four microphones strategically placed to enhance audio input and overall user experience. These microphones are thoughtfully positioned in various locations on the device to capture sound from different directions and purposes, contributing to superior call quality, audio recording, and even advanced features like noise cancellation. Here’s a breakdown of the microphone locations on these iPhones:
- Bottom Grill Microphone: The first microphone is located at the bottom of the iPhone, positioned near the stereo speaker and next to the Lightning connector. Microphones play an important role in your iPhone. It helps ensure clear audio transmission and reception during phone conversations and multimedia playback.
- Front Earpiece Microphone: The second microphone is discreetly positioned behind the earpiece grill at the top of the iPhone’s display. This microphone primarily serves the purpose of capturing your voice during phone calls. This particular microphone allows your voice-over calls to be transmitted with clarity.
- Rear Camera Microphone: The third microphone is located at the back of the iPhone, adjacent to the camera module. This microphone plays a vital role in audio recording when using the rear-facing camera to capture videos. It helps capture high-quality audio that syncs seamlessly with the recorded visuals, enhancing the overall audiovisual experience when shooting videos and capturing moments.
- Additional Microphone (iPhone 14): The iPhone 14, being a newer model, may incorporate additional microphones or advanced microphone technologies that contribute to improved audio quality and innovative features. Apple often introduces new audio technologies and enhancements with each iPhone iteration, further elevating the user experience.
These strategically placed microphones showcase Apple’s commitment to delivering exceptional audio quality and functionality in its iPhone lineup.
How to locate the Microphone on Older iPhones
In earlier iPhone models such as the iPhone 5, 6 Plus, or the SE, there is a configuration of three strategically placed microphones aimed at delivering optimal audio performance. These microphones are strategically positioned to cater to various audio input scenarios, even in the context of older iPhone models. Let’s delve into the locations and functions of these microphones:
- Bottom Grill Microphone: Positioned at the lower edge of the iPhone, adjacent to the stereo speaker, the first microphone plays a critical role in capturing audio in a variety of situations. This microphone is instrumental during phone calls, video recordings, and multimedia playback, ensuring that your voice or any other sounds are captured with clarity, especially when the iPhone is held in landscape mode.
- Front Earpiece Microphone: The second microphone is discreetly concealed behind the earpiece grill at the top of the iPhone’s display. It is primarily dedicated to capturing your voice during phone calls. By effectively isolating and capturing your voice, this microphone guarantees that your communication remains clear and comprehensible to the recipient, ensuring a seamless and reliable conversation experience.
- Rear Camera Microphone: The third microphone, located at the back of the iPhone and adjacent to the camera module, comes into play when you engage in video recording using the rear-facing camera. Its role is to capture high-quality audio to complement the visuals you are recording, resulting in a more immersive and synchronized audiovisual experience when you’re capturing precious moments or recording videos.
These microphones contribute to the overall functionality of the device, ensuring that your older iPhone remains capable of delivering clear audio for phone calls, multimedia consumption, and basic video recording.
As technology continually advances, newer iPhone models may incorporate additional microphones and more advanced audio technologies. However, even with older iPhone models, Apple’s dedication to delivering a reliable and efficient audio experience remains evident through the thoughtful placement and utilization of these microphones.
What to do if Microphine is Faulty
If you’re experiencing difficulties with your phone or FaceTime calls, where people on the other end can’t hear you clearly, there are steps you can take to diagnose and potentially resolve the issue. It’s essential to ensure that your device’s microphone is functioning correctly. Here’s a comprehensive guide on how to troubleshoot and test your iPhone’s microphone in various scenarios:
For Phone or FaceTime Calls:
- Open the Voice Memos App: Begin by locating and opening the Voice Memos app on your iPhone. This app is a valuable tool for recording and testing your device’s microphone.
- Record Your Voice: Inside the Voice Memos app, tap the “Record” button. Speak clearly at the bottom of your phone to create a recording. After a brief moment, stop the recording.
- Playback the Memo: Now, play back the recorded memo. Listen carefully to ensure that your voice comes through clearly and without any distortion or interference. This will help determine if your device’s microphone is functioning properly.
If you can hear your voice clearly during the playback, it suggests that the microphone used for regular phone calls and FaceTime is working as expected. If the issue persists, consider checking for any software updates or seeking assistance from Apple Support.
For Speakerphone Usage:
- Open the Camera App: To assess the microphone used during speakerphone calls, open the Camera app on your iPhone. This app will enable you to test the microphone when your device is in speakerphone mode.
- Record Two Videos: While in the Camera app, start recording a video while speaking at the top of your iPhone. After recording the first video, tap the camera chooser to switch to the other camera (usually the rear camera) and record another video while speaking at the top of your iPhone.
- Playback the Videos: Once both videos are recorded, play them back. Pay close attention to the audio quality to ensure that your voice is clear and without any issues. This will help you identify if the microphone used during speakerphone calls is functioning correctly.
If the audio in both videos is clear and your voice is easily discernible, it indicates that the microphone used during speakerphone calls is operational. However, if you encounter issues, you may want to explore further troubleshooting steps, such as checking for debris or obstructions near the microphone openings, adjusting your device’s settings, or contacting Apple Support for assistance.
By following these steps, you can efficiently diagnose and address microphone-related issues during both regular phone calls and speakerphone usage, ensuring that your communication experiences remain uninterrupted and clear.
Troubleshooting Microphone not Working on an App
If your microphone isn’t working in a particular app, follow these simple steps:
- Open your iPhone settings.
- Scroll down and tap on “Privacy.”
- Find and select “Microphone.”
- Look for the app that’s not working with the microphone.
- Make sure the switch next to the app is turned on, which means the app has permission to access your microphone.
By doing this, you should be able to resolve any microphone issues in that specific app.