You have arrived at the right post to learn how to rotate the screen on Samsung. If this is what you are looking for, good news, this post will guide you to achieve this in no time.
Supported Samsung Galaxy Device
- Samsung Galaxy F34
- Samsung Galaxy F32
- Samsung Galaxy F31
- Samsung Galaxy F30
- Samsung Galaxy Z Fold 5
- Samsung Galaxy Z Fold 4, Z Fold 3
- Samsung Galaxy Z Fold 2
- Samsung Galaxy Z Fold
- Samsung Galaxy Z Flip 5
- Samsung Galaxy Z Flip 4
- Samsung Galaxy Z Flip 3
- Samsung Galaxy Z Flip 2
- Samsung Galaxy Z Flip
- Samsung Galaxy M34
- Samsung Galaxy M33
- Samsung Galaxy M32
- Samsung Galaxy M31
- Samsung Galaxy M30
- Samsung Galaxy F54
- Samsung Galaxy F53
- Samsung Galaxy F52
- Samsung Galaxy F51
- Samsung Galaxy F50
- Samsung Galaxy A24
- Samsung Galaxy A23
- Samsung Galaxy A22
- Samsung Galaxy A22
- Samsung Galaxy A21
- Samsung Galaxy A20
- Samsung Galaxy F14
- Samsung Galaxy F13
- Samsung Galaxy F12
- Samsung Galaxy F11
- Samsung Galaxy F10
- Samsung Galaxy M54
- Samsung Galaxy M53
- Samsung Galaxy M52
- Samsung Galaxy M51
- Samsung Galaxy M50
- Samsung Galaxy A54
- Samsung Galaxy A53
- Samsung Galaxy A52
- Samsung Galaxy A51
- Samsung Galaxy A50
- Samsung Galaxy A34
- Samsung Galaxy A33
- Samsung Galaxy A32
- Samsung Galaxy A31
- Samsung Galaxy A30
- Samsung Galaxy M14
- Samsung Galaxy M13
- Samsung Galaxy M12
- Samsung Galaxy M11
- Samsung Galaxy M10
- Samsung Galaxy S23 Ultra
- Samsung Galaxy S23 Plus
- Samsung Galaxy S23
- Samsung Galaxy S23 FE
- Samsung Galaxy S22
- Samsung Galaxy S22 Ultra
- Samsung Galaxy S21
- Samsung Galaxy S21 Ultra
- Samsung Galaxy S20
- Samsung Galaxy S20 Plus
- Samsung Galaxy S20 FE
- Samsung Galaxy S10 Plus
- Samsung Galaxy S10
- Samsung Galaxy S9 Plus
- Samsung Galaxy S8 Plus
- Samsung Galaxy S7
- Samsung Galaxy A14
- Samsung Galaxy A13
- Samsung Galaxy A12
- Samsung Galaxy A11
- Samsung Galaxy A10
- Samsung Galaxy F04
- Samsung Galaxy F03
- Samsung Galaxy F02
- Samsung Galaxy F01
- Samsung Galaxy A04e
- Samsung Galaxy A03e
- Samsung Galaxy A02
- Samsung Galaxy A04s
- Samsung Galaxy A03s
- Samsung Galaxy Xcover 6
- Samsung Galaxy Xcover 5
- Samsung Galaxy Xcover 4
- Samsung Galaxy Xcover 3
- Samsung Galaxy Xcover 2.
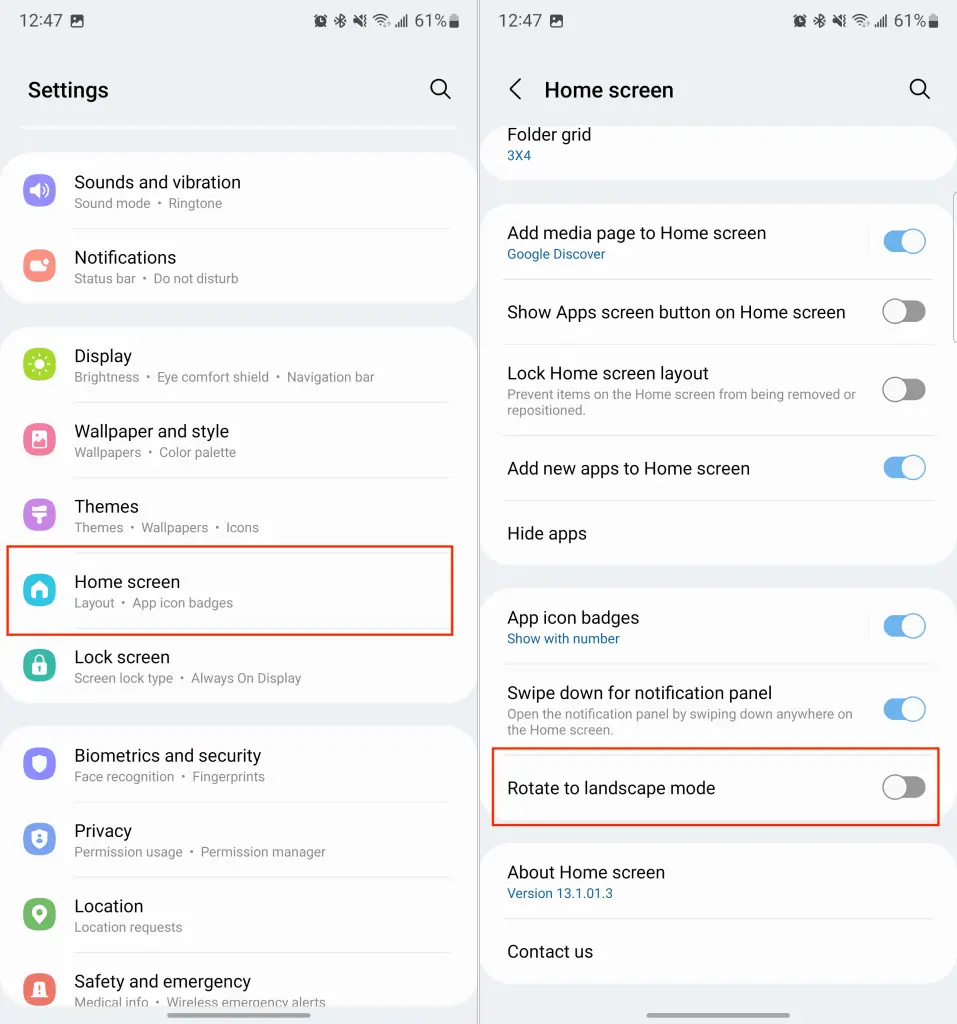
How to Control Screen Rotation on Your Device
If you want to control how your screen rotates on your device, follow these easy steps:
Access the Quick Settings Panel:
- Swipe down from the top of your screen. This action opens a quick settings menu.
Find the Rotation Icon:
- Look for an icon related to screen rotation. Depending on your device, you might see icons for Portrait, Landscape, or Auto Rotate.
- Remember, the Portrait and Landscape icons are gray when they’re active, while the Auto Rotate icon is blue when it’s enabled.
Change from Portrait or Landscape to Auto Rotate:
- If your screen is stuck in Portrait or Landscape mode, and you want it to rotate automatically, tap the icon that corresponds to either Portrait or Landscape. This action will activate Auto Rotate.
- If Auto Rotate is already on, you don’t need to select anything.
Close the Quick Settings Panel:
- After enabling Auto Rotate, close the quick settings panel.
Hold Your Device in the Desired Position:
- Depending on whether you want your device screen to be upright or sideways, hold your device accordingly.
Access Quick Settings Again:
- Swipe down from the top of your screen to open the quick settings panel once more.
Lock Your Desired Position:
- Tap the Auto Rotate icon. This will lock your device’s screen in the position you want.
- Remember, when your device is upright, it’s in Portrait mode. When it’s sideways, it’s in Landscape mode.
Enjoy Your Preferred Screen Orientation:
- Once you’ve locked your screen in Portrait or Landscape mode, it will stay that way, no matter how you turn your device.
To Change Screen Orientation or Unlock It:
- If you want to switch to a different orientation or unlock it, simply repeat these steps until you’ve set your preferred screen position.
That’s it! You now have full control over how your device’s screen behaves, making it easy to enjoy content in either Portrait or Landscape mode, or let it automatically rotate as needed.
Auto Rotate: A Convenient Screen Orientation Feature
Auto rotation is a common feature on almost all smartphones these days. It allows your device to adjust to any view you turn to. While using your phone on auto-rotate, it will rotate automatically if you turn it slantly giving you a wide screen. That’s the magic of Auto Rotate.
How It Works:
When Auto Rotate is enabled, your device uses its built-in sensors, such as an accelerometer or gyroscope, to detect changes in its orientation. As you tilt or turn your device, these sensors relay information to the device’s software, which then instructs the screen to rotate accordingly. Auto rotation will give you the best experience while you are using your device.
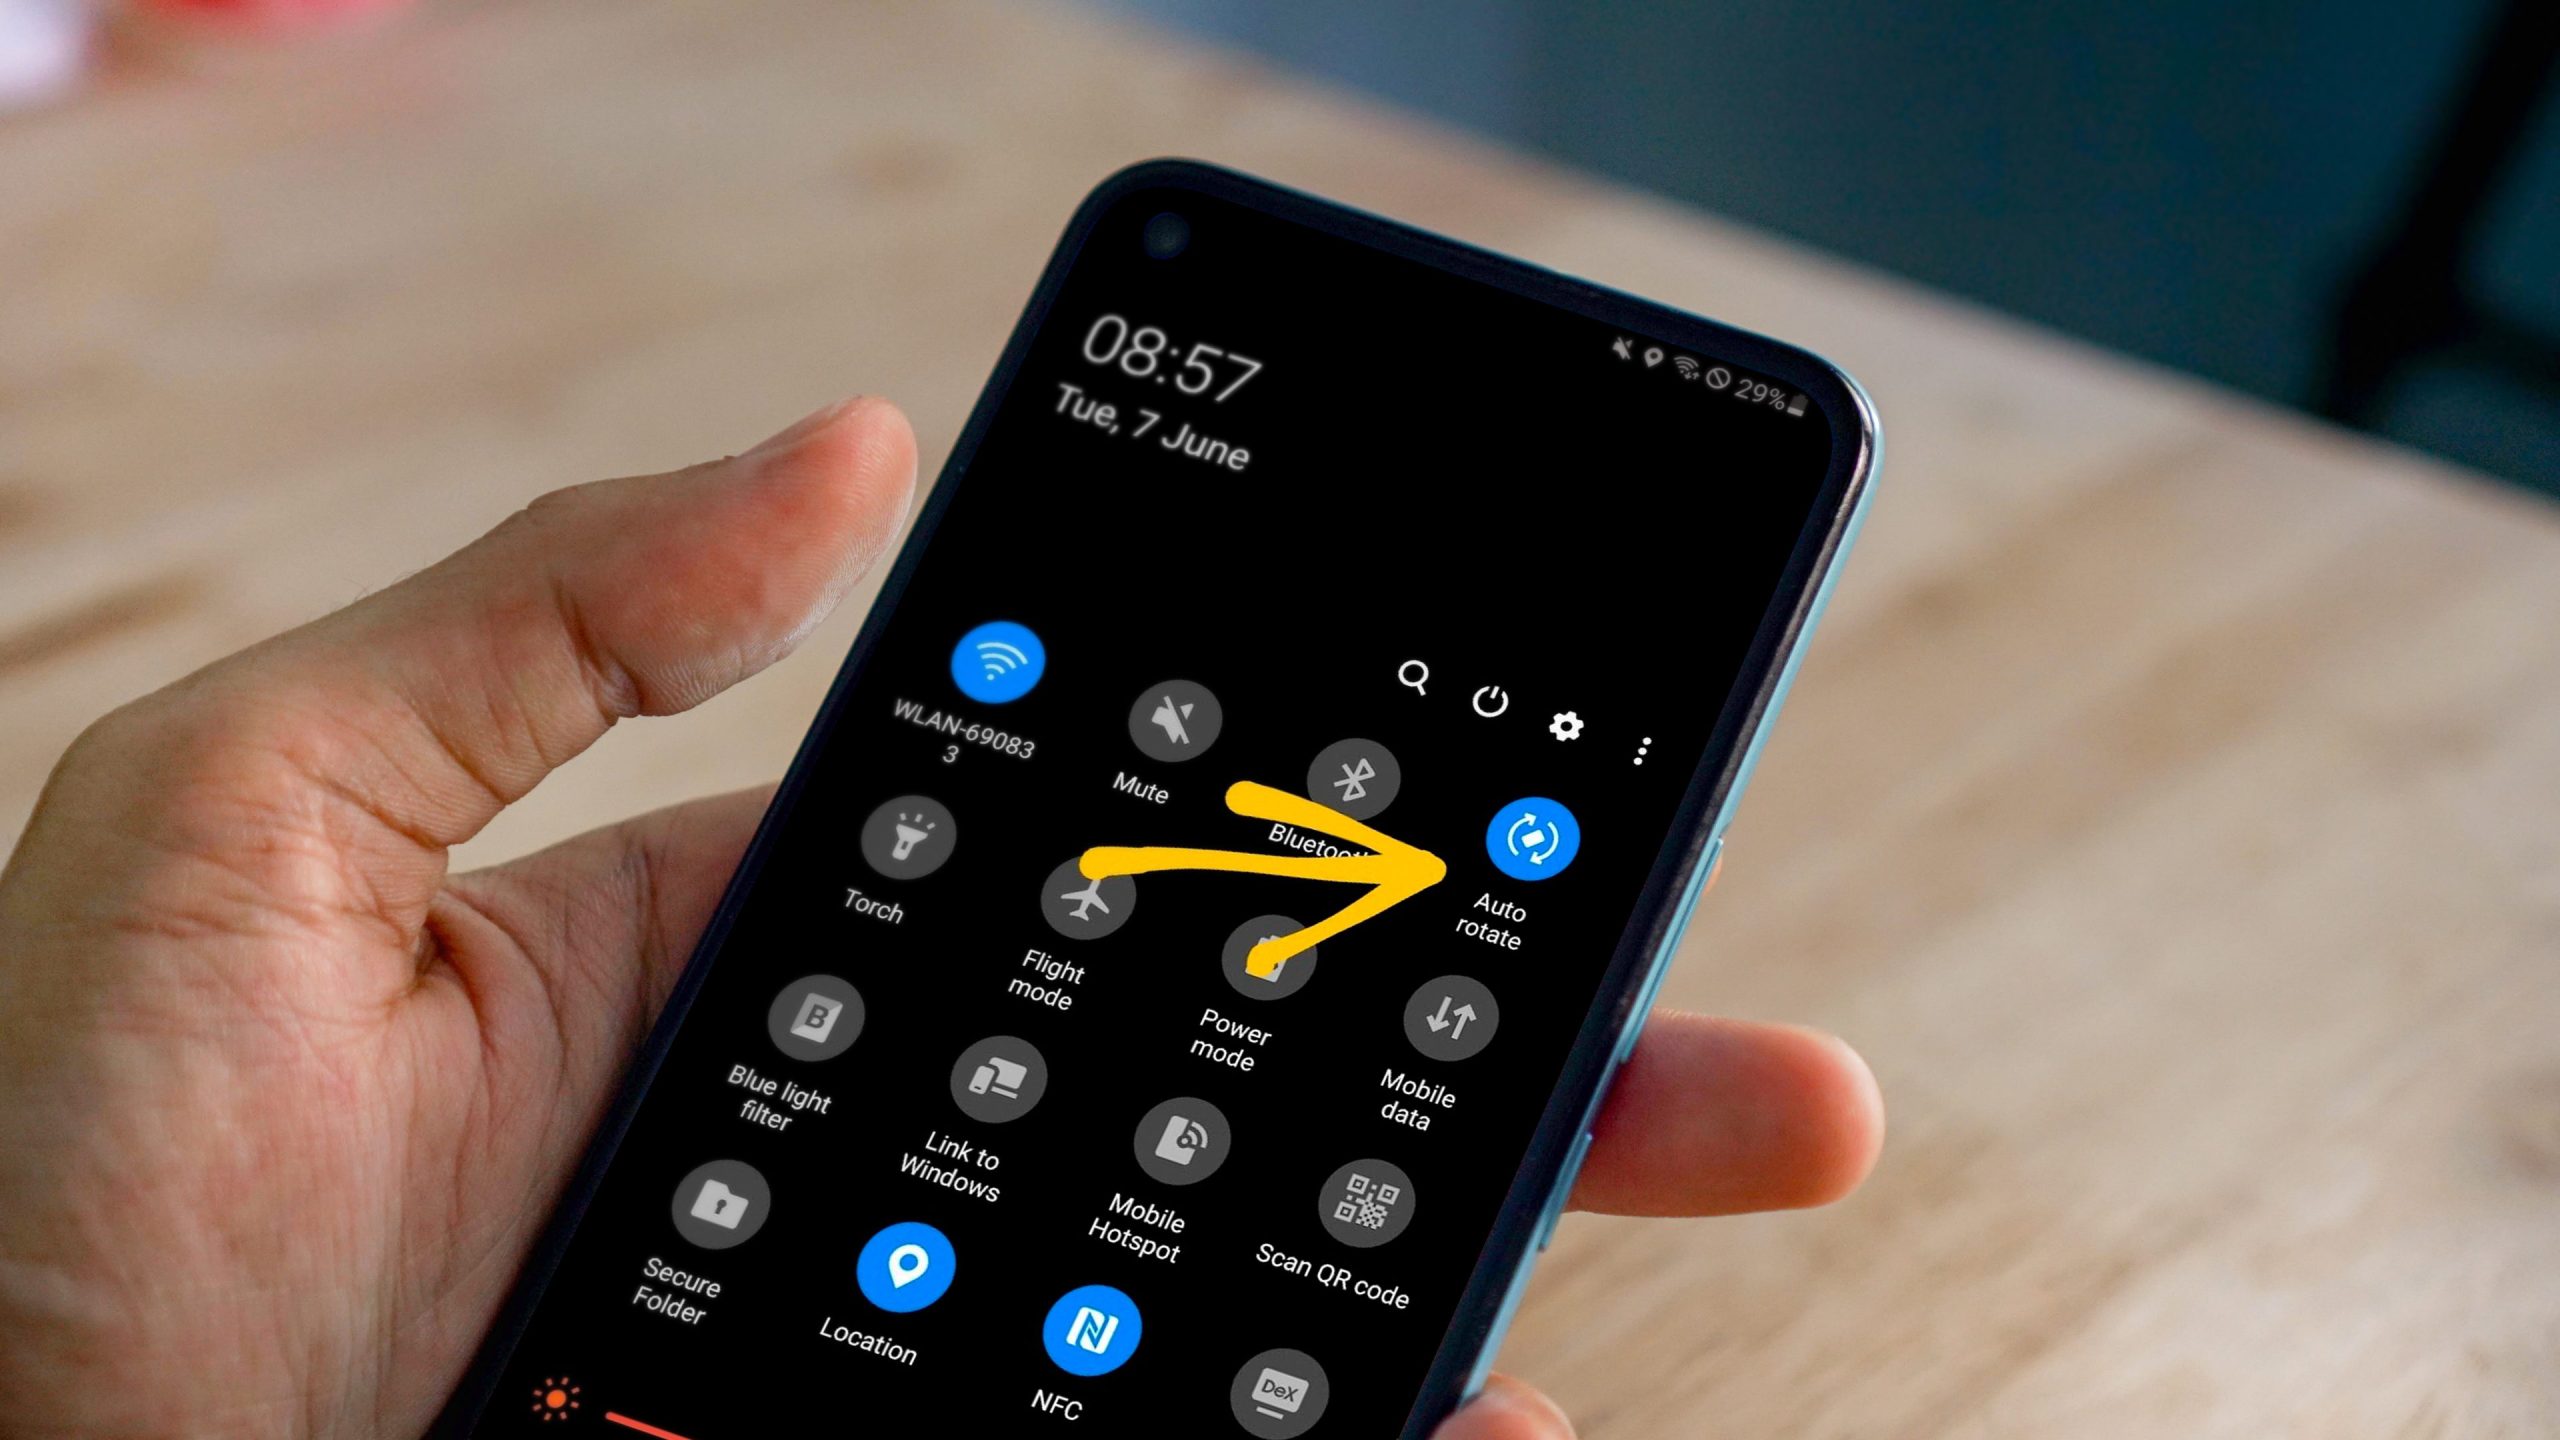
Enabling Auto Rotate:
- Access Quick Settings: To enable Auto Rotate, swipe down from the top of your device’s screen to open the Quick Settings menu. You can often find this menu by dragging your finger from the top edge of the screen downwards.
- Locate the Auto Rotate Icon: In the Quick Settings menu, look for the Auto Rotate icon. It typically appears as a small phone or tablet surrounded by two arrows forming a circular shape.
- Toggle Auto Rotate On: Simply tap the Auto Rotate icon. When it’s enabled, the icon will typically glow blue or show some indication that it’s active.
Versatile Applications:
Auto Rotate is incredibly versatile and enhances your user experience in numerous scenarios:
- Reading E-books: When you hold your device vertically, the content appears in portrait mode, making it easier to read. However, when you switch to landscape mode, you can view images or charts in their full glory.
- Watching Videos: Auto Rotate ensures that you can enjoy videos in full-screen landscape mode, providing a cinematic experience.
- Gaming: Many mobile games are optimized for landscape mode. Auto Rotate allows you to seamlessly transition between portrait and landscape orientations while gaming.
- Web Browsing: Whether you’re reading articles or scrolling through web pages, Auto Rotate ensures that you have an ideal view, regardless of your device’s orientation.
- Maps and Navigation: Auto Rotate can be particularly useful when using navigation apps, as it automatically adjusts the map orientation based on your driving direction.
This feature gives that smooth usage feeling when you are using your device. So, the next time you want to switch from portrait to landscape mode effortlessly, remember to enable Auto Rotate and let your device do the work for you.
Portrait and Landscape Mode: Screen Orientation Lock
Portrait mode and Landscape mode provide control over your device’s screen orientation. In Portrait mode, your screen is locked in an upright position, while Landscape mode locks it in a horizontal orientation. Both modes are represented by icons resembling locks and are typically displayed in gray when enabled.
Portrait Mode:
Portrait mode ensures that your device’s screen remains fixed in an upright position, regardless of how you hold it. This orientation is useful for tasks like reading e-books, viewing photos, or using apps designed for a vertical layout. When Portrait mode is enabled, your device’s screen will resist automatic rotation based on its orientation, providing a consistent viewing experience.
Landscape Mode:
In contrast, Landscape mode locks your screen in a horizontal position. This mode is ideal for activities such as watching videos, playing games optimized for widescreen play, or using navigation apps where a wider perspective is beneficial. Similar to Portrait mode, enabling Landscape mode prevents your device’s screen from automatically adjusting its orientation.
App-Specific Adaptation:
It’s important to note that while Portrait and Landscape modes lock the screen’s orientation, some apps are designed to override these settings as needed. For example, if you’re using an app that’s specifically designed for Landscape mode, it will still rotate the screen horizontally even if Portrait mode is enabled. This flexibility ensures that you get the best viewing experience for each app’s specific requirements.