Setting up your voicemail is easy! If it isn’t for you, then you have come to the right place. After reading this guide, you should be able to set up voicemail on all iPhones by following these simple steps.
Supported iPhone Devices
- iPhone 15
- iPhone 15 Plus
- iPhone 15 Pro
- iPhone 15 Pro Max
- iPhone 14
- iPhone 14 Pro
- iPhone 14 Pro Max
- iPhone 13
- iPhone 13 Mini
- iPhone 13 Pro
- iPhone 13 Pro Max
- iPhone 12 Mini
- iPhone 12
- iPhone 12 Pro
- iPhone 12 Pro Max
- iPhone 11
- iPhone 11 Pro
- iPhone 11 Pro Max
- iPhone XR
- iPhone XS Max
- iPhone XS
- iPhone X
- iPhone 8 Plus
- iPhone 8
- iPhone SE (1st + 2nd Gen)
- iPhone 7 Plus
- iPhone 7
- iPhone 6s Plus
- iPhone 6s
- iPhone 6
Why Set up Voicemail on iPhone?
Setting up voicemail on your iPhone is essential for several reasons:
- Never Miss Important Calls: Voicemail ensures that you don’t miss important calls when you can’t answer your phone. Whether you’re in a meeting, driving, or simply unavailable, callers can leave messages for you to listen to later, allowing you to stay connected and informed.
- Convenience and Efficiency: Voicemail offers a convenient way to receive and manage messages. You can listen to messages at your leisure, prioritize them, and respond when it’s most convenient for you. This flexibility enhances your communication efficiency.
- Professionalism: Having a voicemail set up adds a professional touch to your communication. It tells your caller or gives them the impression that you are reachable always.
- Privacy and Security: Voicemail provides a secure means of communication. Messages left in your voicemail are private and accessible only by you, ensuring the confidentiality of sensitive information shared through voice messages.
It’s a valuable feature that enhances your overall mobile experience.
How to Set up voicemail
Voicemail is a vital feature that ensures you don’t miss important messages when you can’t answer your iPhone. Here’s how to set up your voicemail for the first time and personalize it according to your preferences:
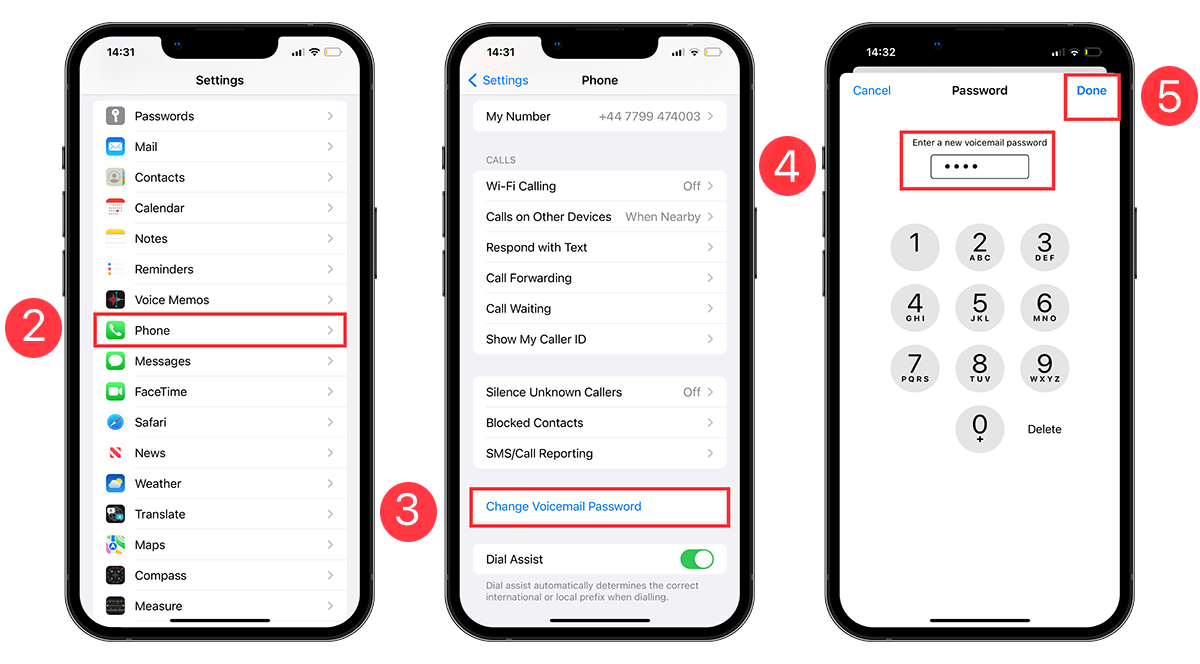
1. Access Your Voicemail:
- Begin by opening the Phone app on your iPhone.
- At the bottom right, tap on the “Voicemail” tab. If it’s your first time accessing voicemail, you’ll be prompted to create a voicemail password and record a voicemail greeting.
2. Initiate Voicemail Setup:
- In the Voicemail tab, tap “Set Up Now” to begin the setup process.
3. Create a Voicemail Password:
- You’ll be prompted to create a secure voicemail password. This password is essential to protect your voicemail messages from unauthorized access. Enter a password of your choice, ensuring it meets your security preferences.
4. Choose Your Voicemail Greeting:
- Next, you have the option to choose between two greeting types:
- Default: Select this option if you want to use the standard voicemail greeting provided by your carrier.
- Custom: Opt for a custom greeting if you prefer a personalized message. If you choose this option, you can record your greeting.
5. Recording a Custom Greeting (Optional):
- If you select the Custom greeting option, you’ll have the opportunity to record a unique voicemail message. Follow the prompts to record your greeting. This is a great way to add a personal touch to your voicemail and make it more engaging for callers.
Your voicemail is set up and ready to use. Callers can now leave messages for you when you’re unavailable, and you can access and manage your voicemail easily through the Voicemail tab in the Phone app. Voicemail ensures you stay connected and informed even when you can’t answer your calls in real time.
How to Turn on Live Voicemail
With Live Voicemail on your iPhone, you can seamlessly access real-time message transcriptions while someone is leaving you a voicemail. This feature allows you to pick up the call even as the message is being recorded. Here’s how to enable Live Voicemail and make the most of this convenient functionality:
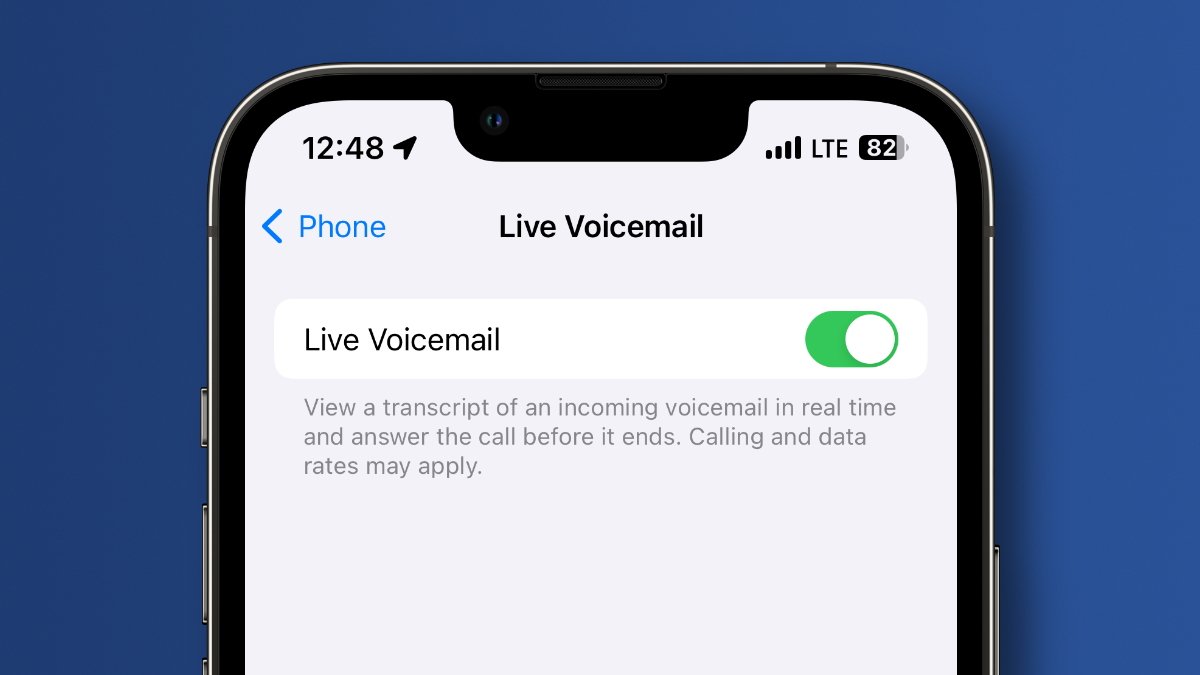
1. Access Live Voicemail Settings:
Start by opening your iPhone’s Settings app.
2. Navigate to Live Voicemail:
Scroll down and select “Phone” from the list of settings options.
3. Enable Live Voicemail:
- Within the Phone settings, locate and tap on “Live Voicemail.”
- To activate Live Voicemail, simply toggle the switch to the “On” position.
4. How Live Voicemail Works:
- When Live Voicemail is enabled, your iPhone will automatically answer an incoming call to capture the caller’s voicemail in real time. You’ll be able to see a live transcription as they leave their message. Please note that data rates may apply.
- Importantly, the caller won’t be able to hear you, and you won’t be able to hear them unless you choose to answer the call.
5. Handling Unavailable Scenarios:
- If your iPhone is turned off or outside your carrier network’s coverage area, the call will be directed to your carrier’s voicemail service, if available.
- If you’ve activated Silence Unknown Callers, unidentified numbers will go directly to Live Voicemail without ringing your phone first. Calls identified as spam by your carrier will be instantly declined and won’t go through Live Voicemail.
You can experience a more efficient and interactive way of managing your voicemail messages in real time, providing you with valuable information even before listening to the full message.