Hello, do you want to learn how to take a screenshot on all iPhones? If your answer to the question is yes, I am glad to tell you that you have arrived at the right post. In this post, I will discuss the step-by-step guide to taking a screenshot of all types and models of iPhones.
All Supported iPhone Devices
- iPhone 15
- iPhone 15 Plus
- iPhone 15 Pro
- iPhone 15 Pro Max
- iPhone 14
- iPhone 14 Pro
- iPhone 14 Pro Max
- iPhone 13
- iPhone 13 Mini
- iPhone 13 Pro
- iPhone 13 Pro Max
- iPhone 12 Mini
- iPhone 12
- iPhone 12 Pro
- iPhone 12 Pro Max
- iPhone 11
- iPhone 11 Pro
- iPhone 11 Pro Max
- iPhone XR
- iPhone XS Max
- iPhone XS
- iPhone X
- iPhone 8 Plus
- iPhone 8
- iPhone SE (1st + 2nd Gen)
- iPhone 7 Plus
- iPhone 7
- iPhone 6s Plus
- iPhone 6s
- iPhone 6
5 Reasons You Should Keep Screenshots
Keeping screenshots can be a lifesaver sometimes, there may be different reasons you will want to keep screenshots but for this post, I will be sharing just 5 reasons with you. Here are the five compelling reasons you should keep screenshots:
- Documentation and Reference: Screenshots are a visual form of documentation. Screenshots can be used as substitutes for receipts, order confirmation, etc proofs. When you need to refer to this information, having a screenshot can make it easier to find and understand, especially when dealing with complex or time-sensitive matters.
- Troubleshooting and Tech Support: When you encounter technical issues on your computer, smartphone, or other devices, taking screenshots can be incredibly helpful. You can capture error messages, software glitches, or unusual behavior, which can assist tech support or help you remember the issue if it occurs again. Providing screenshots can often expedite the troubleshooting process.
- Visual Inspiration and Ideas: Screenshots are a great way to collect visual inspiration and ideas. Whether you’re working on a creative project, redecorating your home, or planning an event, capturing images, designs, or layouts that inspire you can help you brainstorm and reference them later when needed.
- Social Media and Sharing: Screenshots are commonly used for sharing content from your device’s screen on social media or in conversations. They can be used to capture funny text messages, interesting news articles, or memorable social media posts.
- Legal and Accountability: Screenshots can serve as evidence in legal or professional disputes. Whether you need to document online harassment, capture proof of a transaction, or keep a record of conversations, screenshots can help establish a timeline and provide visual evidence. They can be crucial in protecting your rights or interests.
How to Capture Screenshots on iPhones with Face ID
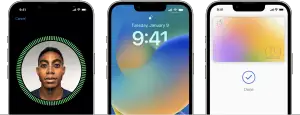
Taking screenshots of iPhone models equipped with Face ID, including the iPhone 14 and others in the series, is a simple and essential skill. In this section, I will be teaching you how you can take screenshots on iPhones with Face ID.
Step 1: Locate the Buttons
- To initiate the screenshot capture process, you’ll need to locate two physical buttons on your iPhone: the side button (previously known as the sleep/wake button) and the volume up button. These buttons are typically located on the right side of the device.
Step 2: Simultaneously Press the Buttons
- Once you’ve identified the side button and the volume up button, press them simultaneously. Ensure you press both buttons at the same time and hold them down briefly.
Step 3: Swiftly Release the Buttons
- After pressing the side button and volume up button together, release both buttons quickly. The timing here is crucial. A successful screenshot is taken when the buttons are released promptly after being pressed.
Step 4: Observe the Screenshot Thumbnail
- Following a successful screenshot, your iPhone will display a thumbnail of the captured image in the lower-left corner of the screen. This thumbnail provides a convenient way to access the screenshot immediately without navigating to the Photos app.
Step 5: Interact with the Screenshot Thumbnail
- You have a few options when the screenshot thumbnail appears:
- Tap to Open: If you want to view, edit, or share the screenshot immediately, tap on the thumbnail. This will open the screenshot in a viewer where you can make annotations, crop, or share it with friends or colleagues.
- Swipe to Dismiss: If you captured the screenshot by accident or no longer need it, you can simply swipe the thumbnail to the left to dismiss it. to access this screenshot in the future, you can check in your picture apps.
By following these steps, you can effortlessly capture and manage screenshots on your iPhone with Face ID.
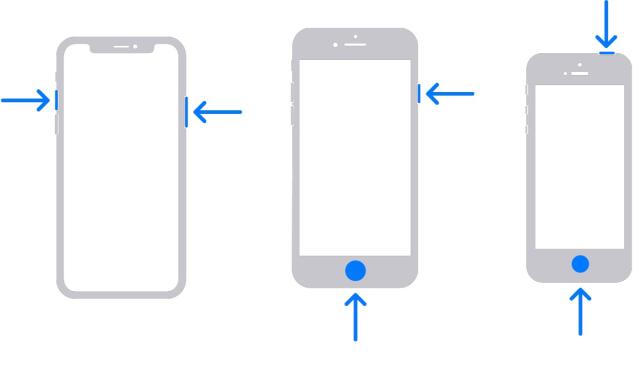
How to Capture Screenshots on iPhones with Touch ID and the Side Button
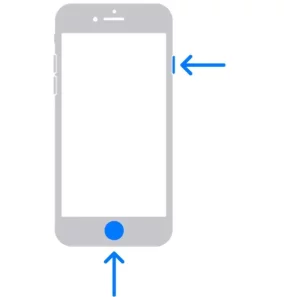
Taking screenshots of iPhone models equipped with Touch ID, featuring the classic Home button and side button, is a straightforward process. Screenshots serve a multitude of purposes, from preserving cherished memories to capturing vital information. Follow the steps below to take screenshots of this type of iPhone:
Step 1: Locate the Buttons
- Begin by identifying two key buttons on your iPhone: the side button (located on the right side of the device) and the Home button (the circular button on the front of the device).
Step 2: Simultaneously Press the Buttons
- With the buttons located, press the side button and the Home button simultaneously. Be sure to press both buttons at the same time, holding them down briefly.
Step 3: Swiftly Release Both Buttons
- After pressing the side button and the Home button simultaneously, release both buttons quickly. Timing is crucial here, as this action triggers the screenshot capture.
Step 4: Observe the Screenshot Thumbnail
- Following a successful screenshot, a thumbnail of the captured image will appear temporarily in the lower-left corner of your screen. This thumbnail offers quick access to the screenshot, eliminating the need to navigate to the Photos app immediately.
Step 5: Interaction with the Screenshot Thumbnail
- When the screenshot thumbnail emerges, you have two options:
- Tap to Open: To view, edit, or share the screenshot right away, tap the thumbnail. This will open the screenshot in a viewer where you can make annotations, crop, or share it with friends, family, or colleagues.
- Swipe to Dismiss: If you took the screenshot accidentally or no longer need it, simply swipe the thumbnail to the left to dismiss it.
How to Take a Screenshot on iPhone Models with Touch ID and Top Button
Capturing a screenshot on iPhones with Touch ID and the top button is a quick and simple process. Here’s an easy-to-follow guide:
Step 1: Locate the Buttons
- Find the top button (also known as the sleep/wake button) and the Home button on your iPhone. The top button is typically on the right side or top edge, while the Home button is at the bottom center.
Step 2: Press Both Buttons Together
- Press the top button and the Home button simultaneously. It’s important to press both buttons at the same time and hold them briefly.
Step 3: Release the Buttons Quickly
- After pressing both buttons together, release them quickly. This action triggers the screenshot.
Step 4: View the Screenshot Thumbnail
- After taking the screenshot, a small thumbnail of the captured image will appear briefly in the lower-left corner of your screen.
Step 5: Interact with the Thumbnail
- You have two choices when the thumbnail appears:
- Tap to Open: To view, edit, or share the screenshot immediately, tap the thumbnail. This opens the screenshot for you to work with.
- Swipe Left to Dismiss: If you captured the screenshot by mistake or no longer need it, swipe the thumbnail to the left to dismiss it. The screenshot will still be saved in your Photos app.
Conclusion
You have successfully learned how to take screenshots on all types of iPhones in this blog post. Do you still have other issues yet to be attended to? Please leave a comment and we will respond to them in no time.