The passcode is very important on your device as it is your first defense against unauthorized access to your device. But if you no longer need it and you wish to turn it off, here are the steps you need to follow to turn off the passcode on your iPhone.
Supported iPhone Devices
- iPhone 15
- iPhone 15 Plus
- iPhone 15 Pro
- iPhone 15 Pro Max
- iPhone 14
- iPhone 14 Pro
- iPhone 14 Pro Max
- iPhone 13
- iPhone 13 Mini
- iPhone 13 Pro
- iPhone 13 Pro Max
- iPhone 12 Mini
- iPhone 12
- iPhone 12 Pro
- iPhone 12 Pro Max
- iPhone 11
- iPhone 11 Pro
- iPhone 11 Pro Max
- iPhone XR
- iPhone XS Max
- iPhone XS
- iPhone X
- iPhone 8 Plus
- iPhone 8
- iPhone SE (1st + 2nd Gen)
- iPhone 7 Plus
- iPhone 7
- iPhone 6s Plus
- iPhone 6s
- iPhone 6
How to turn off Face ID on Your Apple iPhone
If you’re looking to disable Face ID on your Apple iPhone for any reason, follow these comprehensive steps for a seamless experience:
Step 1: Access the Settings
Begin by unlocking your iPhone and navigating to the Settings app. This is usually found on your Home Screen, represented by a gear-wheel icon.
Step 2: Access Face ID & Passcode
Within the Settings menu, scroll down and look for “Face ID & Passcode.” Tap on this option to access the Face ID settings.
Step 3: Enter Your Passcode
You may be prompted to enter your current passcode as a security measure. Provide your passcode to proceed. If you’ve forgotten your passcode or wish to reset it, you may need to contact Apple Support for assistance.
Step 4: Disable the Passcode
Inside the Face ID & Passcode settings, locate the option that says “Turn Passcode Off.” This option allows you to disable your passcode, and subsequently, Face ID.
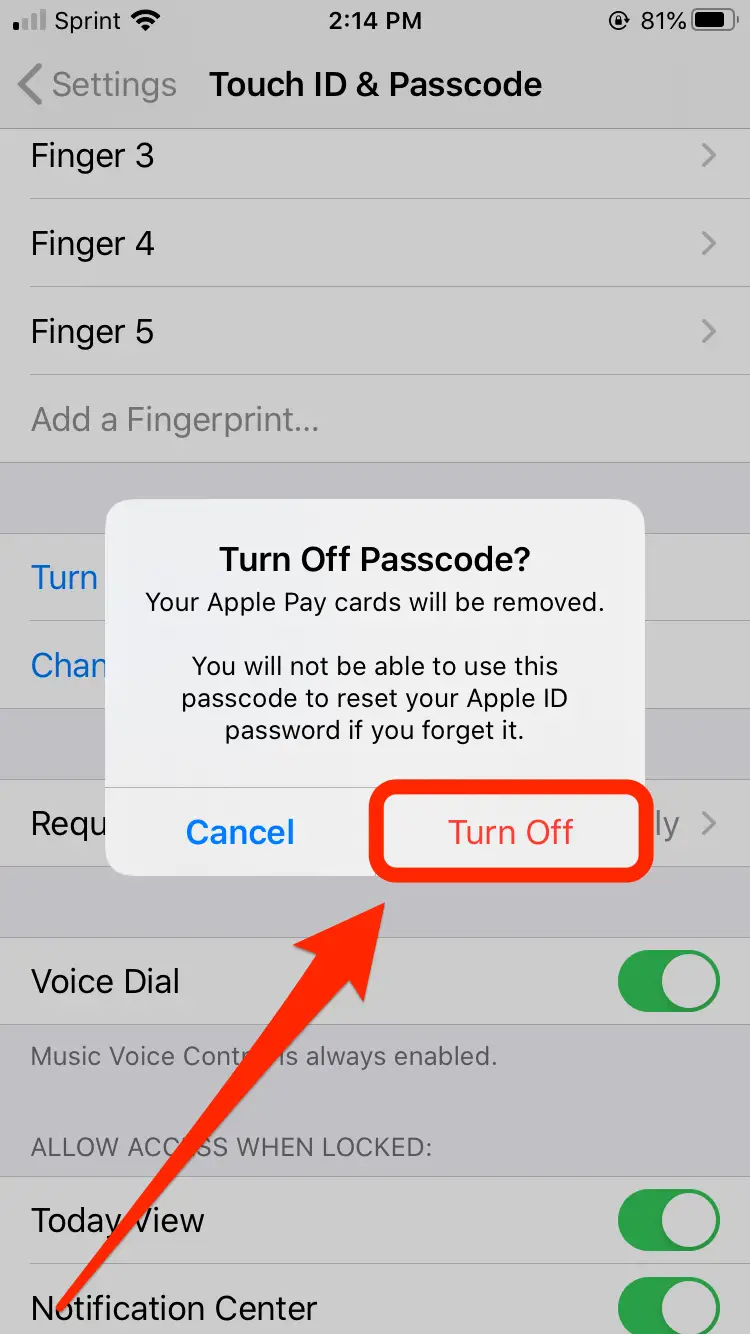
Step 5: Confirm Your Decision
Upon selecting “Turn Passcode Off,” you’ll be asked to confirm your decision. Enter your passcode once more to confirm that you indeed want to disable Face ID.
Step 6: Apple ID Password
In some cases, you may be prompted to enter your Apple ID password for added security. This ensures that only authorized users can make changes to your Face ID settings. Enter your Apple ID password as requested and then tap “Turn off.”
With these steps completed, you’ve successfully disabled Face ID on your iPhone. This action can be useful for various reasons, such as enhanced privacy or temporary security adjustments. If you ever wish to re-enable Face ID, simply follow these steps in reverse order and enjoy the convenience of facial recognition on your device again.
How to Turn off Touch ID or Passcode on iPhone
If you’ve decided to disable Touch ID on your iPhone, whether for privacy reasons or personal preference, you can easily do so by following these detailed steps:
Step 1: Access the Settings
Begin by unlocking your iPhone and locating the Settings app. You’ll typically find it on your Home Screen, represented by a gear-wheel icon.
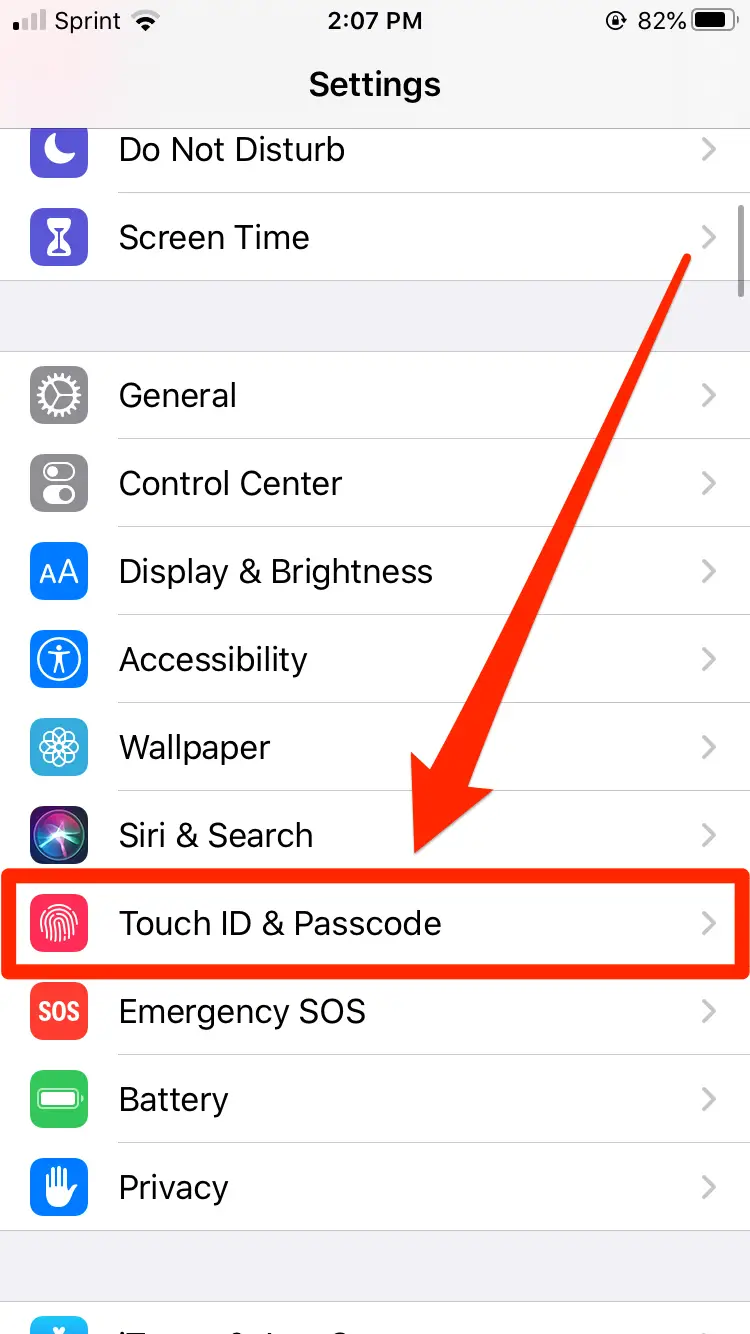
Step 2: Access Touch ID & Passcode
Inside the Settings menu, scroll down or search for the “Touch ID & Passcode” option. Tap on this selection to access the Touch ID settings.
Step 3: Enter Your Passcode
You may be prompted to enter your current passcode as a security measure. Provide your passcode to proceed. If you don’t recall your passcode or need to reset it, you may need to contact Apple Support for assistance.
Step 4: Disable the Passcode
Within the Touch ID & Passcode settings, locate the option that reads “Turn Passcode Off.” Tapping on this option will disable your passcode and, consequently, Touch ID.
Step 5: Confirm Your Decision
After selecting “Turn Passcode Off,” the system will request confirmation. Re-enter your passcode once more to confirm that you indeed want to disable Touch ID.
Step 6: Enter Apple ID Password (if prompted)
In some cases, you might be asked to enter your Apple ID password for added security. This step ensures that only authorized users can make changes to your Touch ID settings. Provide your Apple ID password as prompted and then tap “Turn off.”
You have successfully disabled Touch ID on your iPhone. This action can be beneficial for various reasons, including enhancing your privacy or temporarily modifying your device’s security settings. If you ever decide to re-enable Touch ID, simply reverse these steps, and you’ll have the convenience of fingerprint recognition at your fingertips again.