Sharing content has never been easier than with Apple’s ingenious AirDrop feature. Built into iOS, iPadOS, and MacOS, AirDrop empowers Apple device users to effortlessly exchange a treasure trove of content—ranging from photos, documents, and websites to videos, notes, and map locations—all with the simplicity of wireless connectivity. In this blog post, we’ll delve into the magic of Apple AirDrop, exploring its capabilities and showcasing how it revolutionizes content sharing among Apple enthusiasts.
Supported iPhone Devices
- iPhone 15
- iPhone 15 Plus
- iPhone 15 Pro
- iPhone 15 Pro Max
- iPhone 14
- iPhone 14 Pro
- iPhone 14 Pro Max
- iPhone 13
- iPhone 13 Mini
- iPhone 13 Pro
- iPhone 13 Pro Max
- iPhone 12 Mini
- iPhone 12
- iPhone 12 Pro
- iPhone 12 Pro Max
- iPhone 11
- iPhone 11 Pro
- iPhone 11 Pro Max
- iPhone XR
- iPhone XS Max
- iPhone XS
- iPhone X
- iPhone 8 Plus
- iPhone 8
- iPhone SE (1st + 2nd Gen)
- iPhone 7 Plus
- iPhone 7
- iPhone 6s Plus
- iPhone 6s
- iPhone 6
What to Do Before AirDrop
Before you dive into the seamless world of AirDrop file sharing, there are a few crucial considerations to ensure a smooth exchange of content. Here’s an in-depth look at the essential prerequisites and settings for a trouble-free AirDrop experience:
1. Proximity and Connectivity:
- First and foremost, confirm that the recipient is physically nearby, within Bluetooth and Wi-Fi range. AirDrop relies on these connections for swift transfers.
2. Enable Wi-Fi and Bluetooth:
- Both you and the intended recipient must have Wi-Fi and Bluetooth enabled on your devices. These technologies are the backbone of AirDrop’s functionality.
3. Personal Hotspot:
- Check for any active Personal Hotspot connections. If either party has a Personal Hotspot turned on, it should be switched off temporarily to avoid interference with AirDrop.
4. AirDrop Settings:
- Verify the recipient’s AirDrop receiving settings. If their AirDrop is set to “Contacts Only,” they must have your Apple ID’s email address or mobile number in their contact card for AirDrop to work smoothly. If you’re not in their Contacts, recommend they switch their AirDrop receiving setting to “Everyone” to facilitate the file transfer.
5. Adjust Your AirDrop Settings:
- Remember, you have control over who can see your device and send you content via AirDrop. At any time, you can customize your AirDrop receiving setting to “Contacts Only” or “Receiving Off” to manage who has access to your device and can share content with you.
By adhering to these preparatory steps, you’ll ensure that your AirDrop experience is not only efficient but also hassle-free. Whether you’re sharing photos, documents, or any other files, these considerations pave the way for a seamless exchange of content among your Apple devices.
How to Use AirDrop for Easy Sharing
AirDrop simplifies sharing on your Apple devices. Here’s a straightforward guide to help you get started:
Step 1: Open an App and Select Content
- Begin by opening the app that contains the content you want to share. For instance, if you’re sharing a photo, open the Photos app. You can also select multiple photos by swiping left or right.
- Look for the “Share” option or the “Share” button within the app. Tap on it.
Step 2: Locate the AirDrop Button
- Within the sharing menu, you’ll find the “AirDrop” button. Tap on it to initiate the sharing process.
Step 3: Choose the Recipient
- A list of available AirDrop users will appear. You can either select a specific AirDrop user1 you want to share with or use AirDrop between your own Apple devices.
- If there are multiple nearby devices available for sharing (indicated by a red badge on the AirDrop button), tap the AirDrop button, and then select the user you wish to share with.
Additional Note: If you’re near someone in your Contacts, you can share content by opening the item you want to share and bringing your devices close together.
If the person you’re sharing with is in your Contacts, you’ll see an image with their name. If they’re not in your Contacts, you’ll see their name without an image.
Please Note: Sharing content by bringing devices together (proximity-based sharing) is available if both you and your contact are using an iPhone with iOS 17.
With these straightforward steps, you can make the most of AirDrop to quickly and conveniently share content with friends, family, or your own devices. Enjoy the simplicity of hassle-free sharing on your Apple devices.
How to Accept AirDrop
When someone offers to share content with you through AirDrop, your iPhone or Mac acts as a portal to a world of possibilities. Here’s an insightful guide on how to gracefully accept incoming AirDrop shares and understand where they land:
Step 1: Be Ready for the Alert
- When someone starts an AirDrop share with your device, you’ll receive an alert on your screen. This alert is your gateway to either accepting or declining the incoming content.
Step 2: The Choice to Accept or Decline
- Upon receiving the AirDrop alert, you have the power to choose. You can tap “Accept” if you’re eager to receive the content or “Decline” if it’s something you’d rather pass on.
Step 3: Seamless Integration Within Apps
For most applications, opting to “Accept” means the shared content will neatly slot into the same app it was sent from. For instance:
- Shared photos gracefully find their place within your Photos app.
- Links to websites open directly in Safari, your default web browser.
- If it’s an app link, it will prompt the App Store, allowing you to download or purchase the app with ease.
Step 4: Self-Sharing Simplicity
- Here’s a neat trick: If you decide to AirDrop something to yourself—say, a splendid photo from your iPhone to your Mac—there’s no need to fuss over an “Accept” or “Decline” choice. It’s almost like magic; the content will automatically wing its way to your designated device without any intervention.
Remember, AirDrop enhances your sharing experience by providing a swift and convenient way to exchange content among your Apple devices. So, whether you’re receiving delightful photos from friends or seamlessly transferring files to your own devices, mastering AirDrop acceptance is the key to enjoying the full spectrum of this feature’s capabilities.
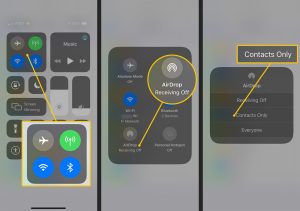
How to Adjust Your AirDrop Settings
Customizing your AirDrop settings is an essential step to control who can interact with your device and share content with you. Follow these simple yet comprehensive steps to configure your AirDrop preferences according to your preferences:
Step 1: Access Your Device Settings
- Begin by unlocking your iPhone or iPad and navigating to the “Settings” app. This serves as your gateway to adjust your AirDrop settings.
Step 2: Enter the General Settings
- Inside the “Settings” app, scroll down and tap on “General.” This is where you’ll find a multitude of device-wide settings, including those related to AirDrop.
Step 3: Customize AirDrop Preferences
- Within the “General” settings, locate and tap on “AirDrop.” This option grants you access to configure your AirDrop preferences.
Step 4: Choose Your Desired AirDrop Option
After selecting “AirDrop,” you’ll be presented with various options for configuring your AirDrop preferences. Here are the available choices:
- “Receiving Off”: Selecting this option effectively disables AirDrop, preventing any incoming content or device visibility.
- “Contacts Only”: This setting restricts AirDrop functionality to only those who are in your device’s Contacts.
- “Everyone”: Opting for this option opens up your device to anyone nearby, allowing them to send you content via AirDrop.
By choosing the most suitable AirDrop option for your needs, you can ensure that your device remains secure and private while still enjoying the convenience of hassle-free content sharing with friends, family, or even strangers nearby.