This blog post will show you how to hard reset your Samsung device with ease. If the device was stolen and you want to reset it for privacy purposes, this post is for you. We will deal with this and more in this blog entry. Keep reading till the end to find out all the Samsung DIY that this post has to offer.
Supported Samsung Galaxy Device
- Samsung Galaxy F34
- Samsung Galaxy F32
- Samsung Galaxy F31
- Samsung Galaxy F30
- Samsung Galaxy Z Fold 5
- Samsung Galaxy Z Fold 4, Z Fold 3
- Samsung Galaxy Z Fold 2
- Samsung Galaxy Z Fold
- Samsung Galaxy Z Flip 5
- Samsung Galaxy Z Flip 4
- Samsung Galaxy Z Flip 3
- Samsung Galaxy Z Flip 2
- Samsung Galaxy Z Flip
- Samsung Galaxy M34
- Samsung Galaxy M33
- Samsung Galaxy M32
- Samsung Galaxy M31
- Samsung Galaxy M30
- Samsung Galaxy F54
- Samsung Galaxy F53
- Samsung Galaxy F52
- Samsung Galaxy F51
- Samsung Galaxy F50
- Samsung Galaxy A24
- Samsung Galaxy A23
- Samsung Galaxy A22
- Samsung Galaxy A22
- Samsung Galaxy A21
- Samsung Galaxy A20
- Samsung Galaxy F14
- Samsung Galaxy F13
- Samsung Galaxy F12
- Samsung Galaxy F11
- Samsung Galaxy F10
- Samsung Galaxy M54
- Samsung Galaxy M53
- Samsung Galaxy M52
- Samsung Galaxy M51
- Samsung Galaxy M50
- Samsung Galaxy A54
- Samsung Galaxy A53
- Samsung Galaxy A52
- Samsung Galaxy A51
- Samsung Galaxy A50
- Samsung Galaxy A34
- Samsung Galaxy A33
- Samsung Galaxy A32
- Samsung Galaxy A31
- Samsung Galaxy A30
- Samsung Galaxy M14
- Samsung Galaxy M13
- Samsung Galaxy M12
- Samsung Galaxy M11
- Samsung Galaxy M10
- Samsung Galaxy S23 Ultra
- Samsung Galaxy S23 Plus
- Samsung Galaxy S23
- Samsung Galaxy S23 FE
- Samsung Galaxy S22
- Samsung Galaxy S22 Ultra
- Samsung Galaxy S21
- Samsung Galaxy S21 Ultra
- Samsung Galaxy S20
- Samsung Galaxy S20 Plus
- Samsung Galaxy S20 FE
- Samsung Galaxy S10 Plus
- Samsung Galaxy S10
- Samsung Galaxy S9 Plus
- Samsung Galaxy S8 Plus
- Samsung Galaxy S7
- Samsung Galaxy A14
- Samsung Galaxy A13
- Samsung Galaxy A12
- Samsung Galaxy A11
- Samsung Galaxy A10
- Samsung Galaxy F04
- Samsung Galaxy F03
- Samsung Galaxy F02
- Samsung Galaxy F01
- Samsung Galaxy A04e
- Samsung Galaxy A03e
- Samsung Galaxy A02
- Samsung Galaxy A04s
- Samsung Galaxy A03s
- Samsung Galaxy Xcover 6
- Samsung Galaxy Xcover 5
- Samsung Galaxy Xcover 4
- Samsung Galaxy Xcover 3
- Samsung Galaxy Xcover 2.
Why you should Hard Reset Samsung
Here are four key reasons to consider a hard reset on your Samsung device:
- Software Troubleshooting: Resolve persistent software issues, crashes, and errors by starting fresh.
- Security Assurance: Erase malware or security threats that standard methods can’t remove, ensuring device security.
- Data Privacy: Prepare your device for resale or transfer by securely erasing personal data and protecting your privacy.
- Performance Boost: Clear accumulated clutter and temporary files to potentially improve device speed and responsiveness.
How to Hard Reset Samsung
If your Samsung Android device becomes unresponsive, whether it’s frozen in an app or displaying a blank screen (white or black), you can follow these steps to restart it:
1. Power Off the Device:
- If possible, turn off the device using the power button. If it’s entirely unresponsive, you may need to remove the battery (if applicable) to force a shutdown.
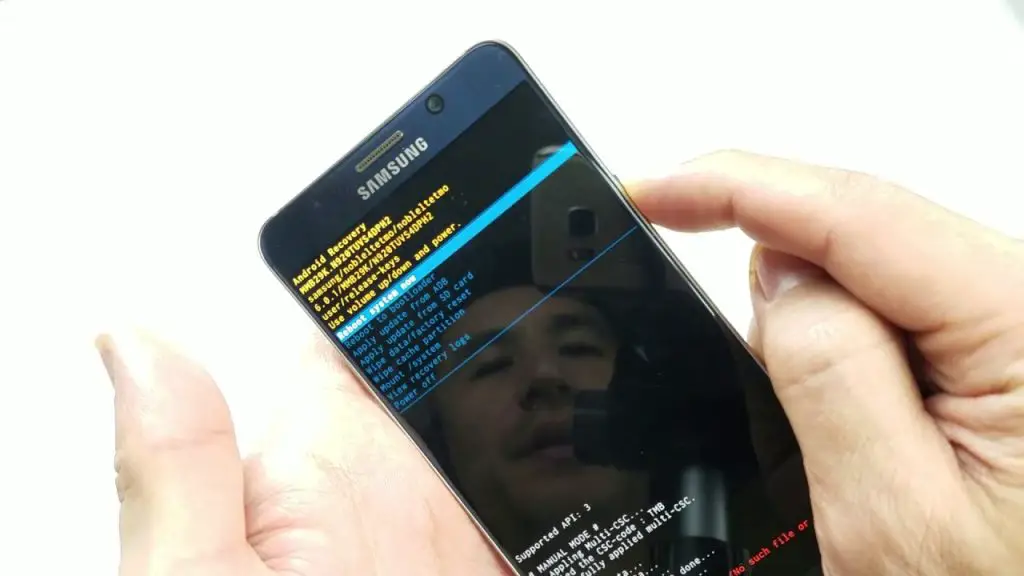
2. Initiate the Recovery Mode:
- Press and hold three buttons simultaneously: the volume up button, the home button (if available), and the power button.
- Keep holding all three buttons even after the device vibrates.
3. Access the Android System Recovery Menu:
- Release the power button when you feel the device vibrate, but continue holding down the volume up and home buttons.
4. Navigate to “reboot system now”:
- Using the volume up and down keys, scroll through the options in the Android system recovery menu.
- Highlight “reboot system now.”
5. Confirm the Restart:
- Press the power button to select “reboot system now.”
- Your device will initiate a standard restart process.
By following these steps, you can effectively restart your Samsung Android device when it becomes unresponsive, ensuring that it returns to normal operation and resolves any issues causing it to freeze or display a blank screen.
How to Soft Reset and Address Frequent Freezing on Your Device
Soft Reset – Restarting a Frozen Device: If your device becomes frozen and unresponsive, performing a soft reset can help resolve the issue. Here’s how to do it:
- Press and Hold Buttons:
-
- Simultaneously press and hold the Power button and the Volume Down button for over 7 seconds.
- Keep holding both buttons until you feel your phone vibrate.
This soft reset should restart your phone and restore it to normal functionality.
Dealing with Frequent Freezing:
If you’re still experiencing freezing issues after performing a soft reset, follow these steps to address the problem:
1. Free Up Memory and Storage Space:
Frequent freezing may occur because of insufficient memory space required for running applications. To resolve this, you can check your device’s available storage space and free up memory.
How to Check Storage Space:
- Access Settings:
-
- Go to your device’s Settings.
- Navigate to Storage:
-
- Tap on “Battery and Device Care.”
- Check Storage Space:
-
- Select “Storage” to view the amount of internal storage used.
- Explore different folders to identify apps, images, and files you can uninstall or delete to free up space.
2. Create Memory Space by Clearing Cache:
Clearing cached data can help free up memory and improve your device’s performance.
How to Clear Cache:
- Access Settings:
- Again, go to Settings.
- Navigate to Optimize:
- Tap on “Battery and Device Care.”
- Optimize Now:
- Select “Optimize now” to clear cached data and enhance your device’s performance.
- Completion:
- Once the optimization process is complete, tap “Done.”
By following these steps, you can address freezing issues on your device by ensuring it has adequate memory and storage space and clearing cached data that might contribute to the problem.
Soft Reset vs. Hard Reset: Understanding the Difference
A soft reset and a hard reset serve different purposes. A soft reset simply involves restarting your device to clear temporary data and close open apps, leaving your long-term data intact. A hard reset, on the other hand, completely restores your device to its factory settings, erasing all data permanently. Here’s how to perform each type of reset:
Soft Reset (Restart):
Swipe Down for Quick Settings:
- Swipe down from the top of your device’s screen with two fingers to reveal the Quick Settings panel.
Tap the Power Button:
- Locate the Power button and tap it.
Choose “Power Off”:
- In the power menu that appears, tap the “Power off” option.
Factory Reset via SmartThings Find:
If you need to perform a hard reset, follow these steps carefully:
Prerequisites:
- Your device must be connected to Wi-Fi or a mobile network.
- You must be signed in to your Samsung Account.
- Ensure that remote control and remote unlock settings are enabled on your device.
1. Access SmartThings Find:
- Go to the SmartThings Find website.
2. Sign In:
- Sign in to your Samsung account.
3. Select Your Device:
- On the left side of the screen, you’ll see a list of devices connected to your Samsung Account. Choose the device you want to factory reset.
4. Erase Data:
- Click on “Erase data.”
5. Verify Your Identity:
- You may be asked to verify your identity. If prompted, enter the verification code sent to your Samsung phone or tablet. Then click “Verify.”
6. Confirm Erase:
- A confirmation pop-up will appear. Click “Erase” to proceed.
7. Enter Samsung Account Password:
- You’ll be asked to confirm your Samsung Account password. Enter it and click “Next.”
8. Factory Reset:
- Your device will undergo a factory reset, and you won’t be able to control it remotely after this.
Keep in mind that a hard reset erases all data permanently, so back up important information before proceeding if possible.
Conclusion
Were you able to hard reset your device? If this blog post still could not help you reset your device, please leave a comment and we will get back to you with a reply shortly. If you follow other method and still get the same result, you should leave that in our comment as well to help our teaming users.