Screen recording is easy to do but if you do not know how to do it, do not worry. In this blog post, I will guide you all the way on how you can do this. As a bonus, you will learn how to take screenshots as well from this post. Are you ready to learn? Let us get started and see how you can do all this on your iPhone.
All Supported iPhone Devices
- iPhone 15
- iPhone 15 Plus
- iPhone 15 Pro
- iPhone 15 Pro Max
- iPhone 14
- iPhone 14 Pro
- iPhone 14 Pro Max
- iPhone 13
- iPhone 13 Mini
- iPhone 13 Pro
- iPhone 13 Pro Max
- iPhone 12 Mini
- iPhone 12
- iPhone 12 Pro
- iPhone 12 Pro Max
- iPhone 11
- iPhone 11 Pro
- iPhone 11 Pro Max
- iPhone XR
- iPhone XS Max
- iPhone XS
- iPhone X
- iPhone 8 Plus
- iPhone 8
- iPhone SE (1st + 2nd Gen)
- iPhone 7 Plus
- iPhone 7
- iPhone 6s Plus
- iPhone 6s
- iPhone 6
Why You Should Screen Record
You may have your own personal reasons to screen record but below are some reasons that I think will convince you to screen record:
- Capture Important Moments: Screen recording on your iPhone enables you to capture and save essential moments from your device’s screen. Whether it’s a tutorial, a memorable gameplay session, or an important video call, recording your screen ensures you miss nothing significant.
- Share Information Easily: Screen recordings serve as a practical tool for sharing information. It makes it easy to share a guide with friends. You just need to screen-record yourself doing it at share it with them through messaging apps.
- Troubleshoot and Seek Help: When encountering technical issues or bugs on your device or with an app, recording the problem can be immensely helpful when seeking help from customer support or online communities. A screen recording provides a clear visual of the issue, making it easier for others to diagnose and provide solutions.
- Preserve Content: If you come across content that you want to revisit later, such as live streams, social media stories, or news articles, screen recording allows you to save and store it for future reference, even if the content disappears or becomes inaccessible later on.
How to Screen Record on Your iPhone
Recording your iPhone screen, along with sound, can be a powerful way to capture and share content, create tutorials, troubleshoot issues, or simply preserve memorable moments. Here’s how to do it:
Step 1: Enable Screen Recording
To enable screen recording on your iPhone, follow these steps:
- Open your iPhone’s Settings.
- Scroll down and select Control Center.
- Tap Customize Controls.
- Locate the Screen Recording option (it’s represented by a screen-shaped icon) and tap the green Plus (+) sign next to it. This adds Screen Recording to your Control Center.
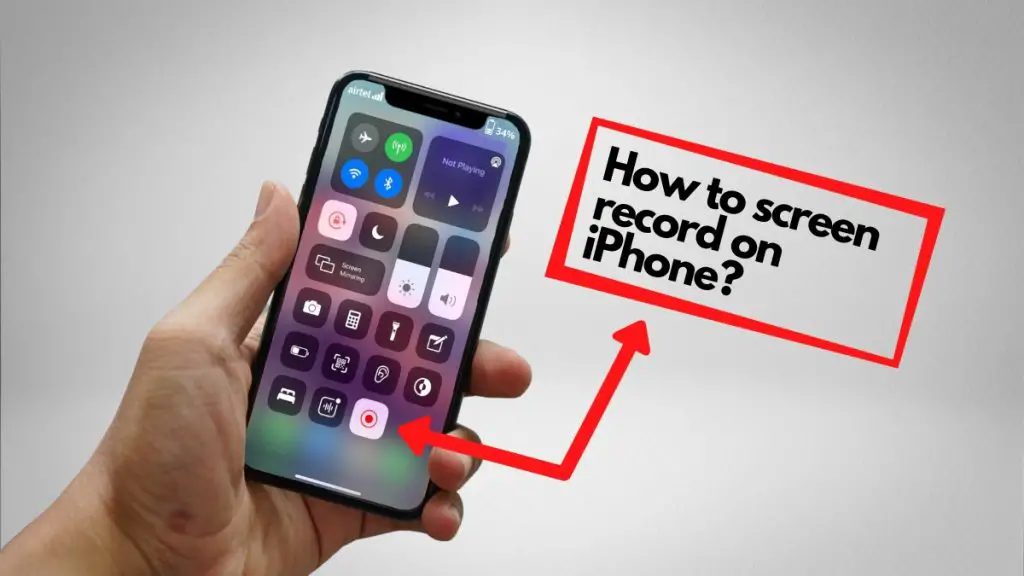
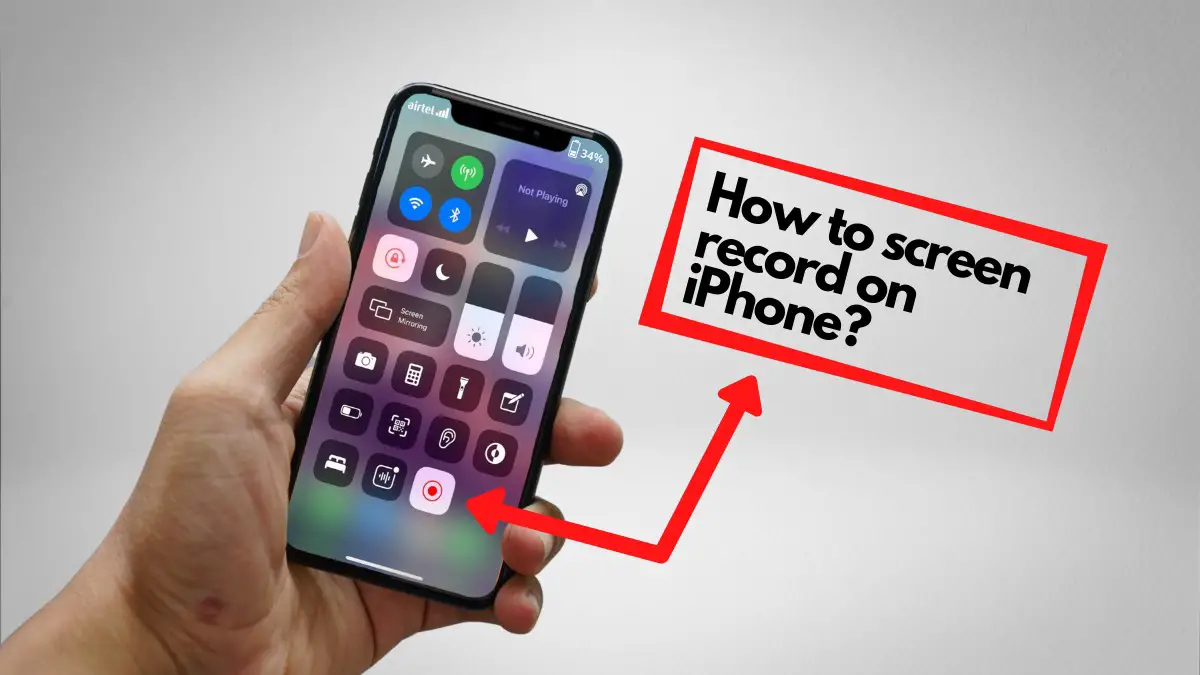
Step 2: Initiate the Screen Recording
Once you’ve added Screen Recording to your Control Center, you’re ready to start recording:
- Swipe down from the upper-right corner of your iPhone to open the Control Center.
- In the Control Center, you’ll see the Screen Recording button (a circle with a dot inside). Tap this button.
You’ll then see a three-second countdown, which gives you a brief moment to prepare.
Step 3: Stop the Recording
When you’re done recording your screen, follow these steps to stop:
- Again, swipe down from the upper-right corner to access the Control Center.
- You can stop the recording by tapping the Screen Recording button once more. Alternatively, you can tap the red status bar at the top of the screen, then select Stop.
Step 4: Access Your Recording
Once you’ve stopped the recording, the video is automatically saved to your iPhone’s Photos app. To find and view your screen recording:
- Open the Photos app.
- Locate and select your screen recording from your library.
From there, you can edit, share, or organize your screen recordings as you see fit.
With these easy-to-follow steps, you’ll be able to make screen recordings with sound on your iPhone effortlessly. Whether you’re sharing knowledge, troubleshooting, or simply capturing precious memories, screen recording is a versatile tool at your fingertips.
How to Take Screenshots on Your iPhone
Taking a screenshot on your iPhone is a simple yet essential skill for preserving moments, conversations, or information that you want to revisit later. Depending on your iPhone model, the process may vary slightly. Here’s how to capture a screenshot:
Step 1: Prepare for the Screenshot
Before taking a screenshot, ensure that the content you want to capture is displayed on your iPhone’s screen. This could be anything from a memorable message to an interesting article or a high score in a game.
Step 2: Perform the Screenshot
Now, let’s dive into the specific actions needed for your iPhone model:
- For iPhones with Face ID (e.g., iPhone X, iPhone 11, iPhone 12):
- Simultaneously press and release the Side button (located on the right side of the device) and the Volume Up button (found on the left side). You’ll hear a satisfying camera shutter sound, and the screen will briefly flash, indicating that the screenshot has been taken.
- For iPhones with a Home button (e.g., iPhone SE, iPhone 7, iPhone 8):
- Simultaneously press and release the Home button (the circular button at the bottom of the screen) and the Side button (located on the right side). Just like with Face ID iPhones, you’ll hear the camera shutter sound and see the screen flash briefly.
Step 3: Review and Edit
After capturing your screenshot, a small thumbnail of the screenshot will briefly appear in the lower-left corner of your iPhone’s screen. This thumbnail provides you with a quick preview of the screenshot and some options for further actions:
- Tap the screenshot thumbnail to open it immediately.
- If you need to make any annotations or edits to the screenshot, tap on it to open the editing tools.
- To complete the screenshot process, tap Done in the top-left corner.
Step 4: Choose What to Do with the Screenshot
Now, you have options for what to do with your screenshot:
- Save to Photos: This option adds the screenshot to your iPhone’s Photos app, making it easily accessible in the “Screenshots” album. If iCloud Photos is enabled in Settings > Photos, the screenshot will also appear in the “All Photos” album.
- Save to Files: Selecting this option allows you to save the screenshot to your iPhone’s Files app, where you can organize and manage your files.
- Delete Screenshot: If you took the screenshot by mistake or no longer need it, you can instantly delete it using this option.
Conclusion
If you have followed the steps as I outlined in the post by now you should be able to screen record and take screenshots on your iPhone smartphone. If you still cannot do this or you still have some issues relating to screen recording, please leave a comment and I will be back to check on that.