You have arrived at the right DIY to set up Visual voicemail on Samsung. In this blog entry, I will walk you through the steps to set up visual voicemail on your device. With this guide, you are sure to have this done in no time at all, it won’t take you much time to complete it and have it set up and functioning on your device.
Supported Samsung Galaxy Device
- Samsung Galaxy F34
- Samsung Galaxy F32
- Samsung Galaxy F31
- Samsung Galaxy F30
- Samsung Galaxy Z Fold 5
- Samsung Galaxy Z Fold 4, Z Fold 3
- Samsung Galaxy Z Fold 2
- Samsung Galaxy Z Fold
- Samsung Galaxy Z Flip 5
- Samsung Galaxy Z Flip 4
- Samsung Galaxy Z Flip 3
- Samsung Galaxy Z Flip 2
- Samsung Galaxy Z Flip
- Samsung Galaxy M34
- Samsung Galaxy M33
- Samsung Galaxy M32
- Samsung Galaxy M31
- Samsung Galaxy M30
- Samsung Galaxy F54
- Samsung Galaxy F53
- Samsung Galaxy F52
- Samsung Galaxy F51
- Samsung Galaxy F50
- Samsung Galaxy A24
- Samsung Galaxy A23
- Samsung Galaxy A22
- Samsung Galaxy A22
- Samsung Galaxy A21
- Samsung Galaxy A20
- Samsung Galaxy F14
- Samsung Galaxy F13
- Samsung Galaxy F12
- Samsung Galaxy F11
- Samsung Galaxy F10
- Samsung Galaxy M54
- Samsung Galaxy M53
- Samsung Galaxy M52
- Samsung Galaxy M51
- Samsung Galaxy M50
- Samsung Galaxy A54
- Samsung Galaxy A53
- Samsung Galaxy A52
- Samsung Galaxy A51
- Samsung Galaxy A50
- Samsung Galaxy A34
- Samsung Galaxy A33
- Samsung Galaxy A32
- Samsung Galaxy A31
- Samsung Galaxy A30
- Samsung Galaxy M14
- Samsung Galaxy M13
- Samsung Galaxy M12
- Samsung Galaxy M11
- Samsung Galaxy M10
- Samsung Galaxy S23 Ultra
- Samsung Galaxy S23 Plus
- Samsung Galaxy S23
- Samsung Galaxy S23 FE
- Samsung Galaxy S22
- Samsung Galaxy S22 Ultra
- Samsung Galaxy S21
- Samsung Galaxy S21 Ultra
- Samsung Galaxy S20
- Samsung Galaxy S20 Plus
- Samsung Galaxy S20 FE
- Samsung Galaxy S10 Plus
- Samsung Galaxy S10
- Samsung Galaxy S9 Plus
- Samsung Galaxy S8 Plus
- Samsung Galaxy S7
- Samsung Galaxy A14
- Samsung Galaxy A13
- Samsung Galaxy A12
- Samsung Galaxy A11
- Samsung Galaxy A10
- Samsung Galaxy F04
- Samsung Galaxy F03
- Samsung Galaxy F02
- Samsung Galaxy F01
- Samsung Galaxy A04e
- Samsung Galaxy A03e
- Samsung Galaxy A02
- Samsung Galaxy A04s
- Samsung Galaxy A03s
- Samsung Galaxy Xcover 6
- Samsung Galaxy Xcover 5
- Samsung Galaxy Xcover 4
- Samsung Galaxy Xcover 3
- Samsung Galaxy Xcover 2.
Reasons you Should Setup Visual Voicemail on Samsung
Setting up visual voicemail on your Samsung phone can offer several advantages, making it a worthwhile feature to consider. Here are three compelling reasons to set up visual voicemail:
- Efficient Management: Easily organize and prioritize messages.
- Enhanced Accessibility: Read transcriptions and listen to messages.
- Time-Saving: Quickly handle important messages, improving productivity.
Compatibility and Requirements for Visual Voicemail on Samsung Phones
It is very important that you check for compatibility for your device before you try activating the visual voicemail. Below are some features that your device need to function well with visual voicemail. Let us take a look:
Check Compatibility
- Ensure your Samsung phone supports visual voicemail.
- Double-check even if it’s a modern Samsung phone.
- Access settings through the phone’s menu.
Visual Voicemail Option
- Go to the “Voicemail” or “Phone” section in settings.
- Look for the visual voicemail option.
- If not found, your phone may not support it.
- Consider checking with your service provider or upgrading your device.
Requirements for Visual Voicemail
- Maintain a working data connection (Wi-Fi or mobile data).
- Visual voicemail relies on data for message retrieval.
- A stable internet connection is crucial.
Software Updates
- Ensure your phone runs the latest software version.
- Software updates often improve visual voicemail performance.
- Update your device regularly.
Storage Space
- Check for sufficient storage space on your Samsung phone.
- Voicemail messages can consume storage.
- Delete unwanted messages or transfer them to another storage location as needed.
Step 1: Determine Visual Voicemail Compatibility on Your Samsung Phone
Before setting up visual voicemail on your Samsung phone, it’s essential to confirm whether your device supports this feature. Follow these steps to check for visual voicemail compatibility:
1. Access the Phone Settings:
- Unlock your Samsung phone and navigate to the home screen.
- Locate the “Settings” app, often represented by a gear icon, and tap to open it.
2. Navigate to the Voicemail or Phone Settings:
- Within the Settings menu, scroll down or look for categories or sections related to your phone’s calling features. This might be labeled as “Voicemail” or “Phone.”
3. Search for Visual Voicemail Option:
- Inside the Voicemail or Phone section, scan for an option named “Visual Voicemail” or something similar, such as “Voicemail Services.”
4. Interpret the Results:
- If you discover the “Visual Voicemail” option, your Samsung phone supports visual voicemail, and you can proceed with setting it up.
- If you do not find this option, it suggests that your phone model may not support visual voicemail. In this case, you have two options:
- Contact your service provider: Reach out to your mobile service provider to inquire about visual voicemail compatibility options, as they may offer alternative solutions or upgrades.
- Consider upgrading your device: If visual voicemail is essential to you, you might want to explore upgrading to a Samsung phone model that supports this feature.
By following these steps, you can easily determine whether your Samsung phone is compatible with visual voicemail and make informed decisions about your voicemail setup.
Step 2: Setting Up Visual Voicemail on Your Samsung Phone
If you’ve confirmed that your Samsung phone supports visual voicemail in Step 1, you’re now ready to proceed with the setup. Follow these detailed instructions to activate visual voicemail on your device:
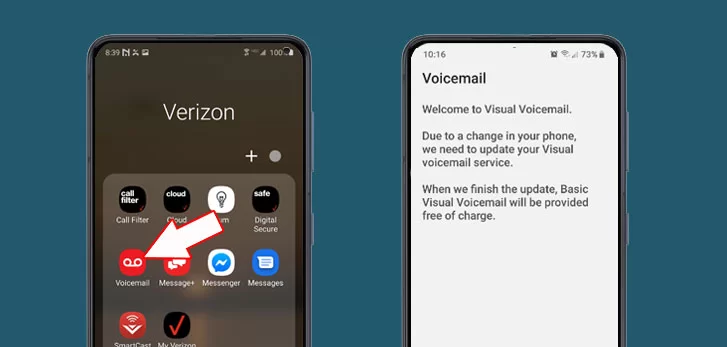
1. Launch the Phone App:
- Unlock your Samsung phone and locate the Phone app on your home screen. Tap to open it.
2. Access the Menu:
- Look for the menu icon, which is typically represented as three dots or lines in the top-right corner of the phone app interface.
3. Open Settings:
- Tap on the menu icon to reveal a dropdown or sidebar menu.
- From this menu, select “Settings” or “Call settings.” This option may vary slightly depending on your phone’s software version.
4. Locate Visual Voicemail:
- Scroll down within the Settings or Call settings menu to find an option labeled “Visual Voicemail” or something similar.
5. Access Visual Voicemail Settings:
- Tap on the “Visual Voicemail” option to access the visual voicemail settings.
6. Follow On-Screen Instructions:
- Once you’re in the visual voicemail settings, follow the on-screen instructions provided by your phone’s interface.
- These instructions typically involve setting up your voicemail account, including preferences for greetings and notifications.
7. Confirm Setup:
- After completing the setup process, your visual voicemail should be active. You may notice a visual voicemail icon or a dedicated tab within your phone app, indicating that visual voicemail is now ready for use.
By following these steps, you can successfully configure visual voicemail on your Samsung phone, enhancing your voicemail experience and making it easier to manage your messages visually.
Step 3: Accessing Your Visual Voicemail Messages
Now that you’ve set up visual voicemail on your Samsung phone, it’s time to use this handy feature. Follow these straightforward steps to access and manage your visual voicemail messages:
1. Open the Phone App:
- Begin by unlocking your Samsung phone and launching the Phone app from your home screen.
2. Find the Visual Voicemail Icon or Tab:
- Look for the visual voicemail icon or tab, usually located at the bottom of the phone app screen. It’s a dedicated section for your voicemail messages.
3. Tap the Visual Voicemail Icon or Tab:
- Tap on the visual voicemail icon or tab to access your voicemail inbox.
4. View Your Voicemail Messages:
- Inside the visual voicemail inbox, you’ll see a list of your voicemail messages, complete with caller names or numbers, as well as the date and time of each message.
5. Listen to a Message:
- To listen to a message, tap on the message you want to hear. You can also swipe left or right to navigate through your messages.
6. Playback Controls:
- While listening to a message, you can use the playback controls to pause, rewind, or fast forward as needed.
7. Delete a Message:
- To delete a message, swipe left on the message and tap on the delete button that appears.
8. Save a Message:
- If you want to keep a message, tap on the More Options icon, usually represented by three dots or lines, and select the “Save” option.
These steps make it easy for you to access and manage your visual voicemail messages, allowing you to stay organized and in control of your voicemail communication. Enjoy your new visual voicemail feature!
Conclusion
Setting up Visual Voicemail on a Samsung device is a breeze. It ensures your voicemail works smoothly and keeps you from missing important messages. Visual Voicemail makes organizing and handling your messages a snap, no matter where you are, so you stay connected and organized effortlessly.