To record on YouTube TV, log in to your YouTube TV and select the channel or show you want to record, tap on the “+” icon to start the recording.
YouTube TV has revolutionized the way we consume television content by offering a wide range of channels and features that cater to modern viewing preferences. One standout feature is the ability to record live TV shows and events, ensuring that you never miss a moment of your favorite programs. In this article, we’ll provide you with a step-by-step guide on how to effectively utilize YouTube TV’s recording functionality and make the most of your viewing experience.
Understanding YouTube TV’s Recording Feature
YouTube TV’s recording feature allows users to capture live TV content and save it for later viewing. This feature is especially valuable when your schedule conflicts with a show’s airtime or when you want to build a library of your preferred shows and movies. Unlike traditional DVRs, YouTube TV’s recording feature is cloud-based, which means your recorded content is stored online rather than on a physical device.
Step-by-Step Guide to Recording on YouTube TV
- Access YouTube TV: Open the YouTube TV app on your device. Ensure you’re signed in with your Google account that’s linked to your YouTube TV subscription.
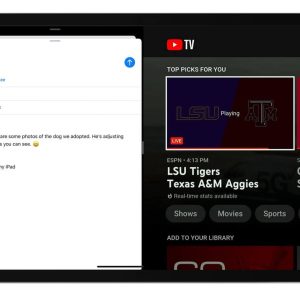
- Navigate to the Show: Use the app’s interface to find the TV show or event you want to record. You can search for it or explore the program guide to locate upcoming shows.
- Initiate Recording:
- On a Computer: Hover over the show’s thumbnail or name and click the “+” icon to initiate the recording.
- On a Mobile Device: Tap the show’s thumbnail or name, then tap the “+” icon.
- Recording Options:
- When Adding a Single Show: You can choose to record only the specific episode or all episodes of the show.
- When Adding a Sports Team: If you’re a sports enthusiast, you can choose to record all games of a specific sports team.
- Managing Recordings:
- To view your recorded content, go to the Library section of the YouTube TV app.
- From here, you can access your recorded shows and movies, as well as manage your upcoming recordings.
- Watching Recorded Content:
- Simply navigate to the Library section and select the show or movie you’ve recorded.
- You can watch the content at your convenience, fast-forwarding or rewinding as needed.
Tips for Effective Recording
- Manage Storage: While YouTube TV’s cloud-based storage is generous, it’s a good practice to periodically review your recordings and remove content you’ve already watched to free up space for new recordings.
- Recording Conflicts: If you’re trying to record two shows airing at the same time, YouTube TV will prioritize the show you added to your library first. However, you can always watch the other show live or on-demand later.
- Keep an Eye on Expiry: Recorded content is usually available for a limited time, often around 9 months. Be sure to watch your recorded shows within this timeframe.
- Internet Connection: As recorded content is streamed from the cloud, ensure you have a stable and reliable internet connection for smooth playback.
Conclusion
YouTube TV’s recording feature empowers viewers with the flexibility to enjoy their favorite shows and events on their own terms. By following this step-by-step guide, you’ll be able to seamlessly record, access, and watch your desired content at your convenience. As streaming technology continues to evolve, YouTube TV’s recording functionality remains a valuable tool for modern viewers who seek greater control over their TV-watching experience.